
Now that you’ve got an idea about the necessary steps on how to start a successful blog, let’s dive in.
Step 1. Pick a Blog Name and Niche

Choosing a name and a niche (topic) for your blog is an important first step on which many people get stuck.
Remember that no name or idea is truly unique, so don’t overthink it. The important thing is to get started.
1.1. Your blogs’ name
Your blog’s name is your brand. It’s how people will remember you. It will be your domain name as well. The domain name is what people write in the browser to get to your website (www.yourname.com).
I will show you how to purchase your domain name later, in Step 2, as it goes hand-in-hand with your blog hosting.
For now, just think of a few variants of domain names that you would like and check them with the domain availability checker below.
I recommended choosing a domain name shorter than 10 characters, which is easy to remember by people.
It should ideally represent you or the general topics you will be writing about. Also, try to avoid hyphens and numbers as they can be difficult to remember. Lastly, try to pick a .com over others.
Go ahead now and try a few variants and see if they are available. Once you find one you like, write it down or remember it, as you will be getting it in Step 2.
See if your domain is available here on namecheap.
1.2. Your niche
Your blog’s niche is the general topic that you’ll be covering. Examples of niches include: blogging, travel, tech, food, gaming and so on.
The most important thing when picking your niche is to pick one that you’re passionate and curious about. If you won’t love the topic, you’ll have a hard time writing about it.
Here are some questions to help you find the best blog niche for yourself:
- What excites you and makes you look forward to it?
- What are your hobbies?
- What topics do you enjoy learning about?
- Are others interested in these topics as well?
Step 2. Get Your Web Hosting Account and Domain Name

Now that you’ve got your niche and domain name sorted, you will need to get your blog online.
To do this, you will need to purchase your domain name and hosting.
Every website needs web hosting, as it’s where your website files exist and are accessed by your website visitors all around the clock. Without web hosting your blog won’t be online and accessible to other people.
There’s an overwhelming number of web hosting companies to choose from and as a blogging beginner, you won’t know which is the best one to pick for your needs.
This is an important step when learning how to start your blog.
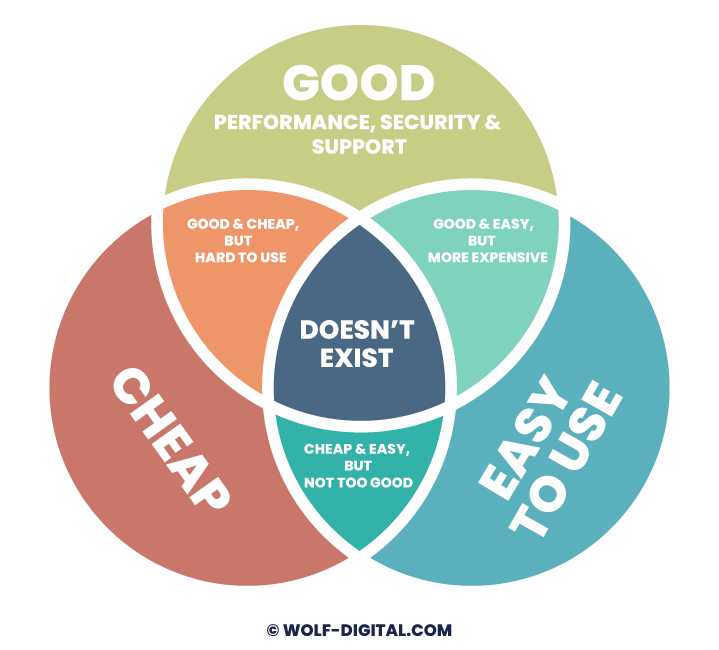
When choosing between different web hosts, blogging beginners are usually forced to pick 2 out of the 3 features that are most important to them: cheap, good & easy to use.
After hosting and testing hundreds of websites on mostly all popular hosting providers, I’ll make your life easier and give you the best option available. This is the host I found to be closest to satisfying all 3 features – cheap, good & easy to use.
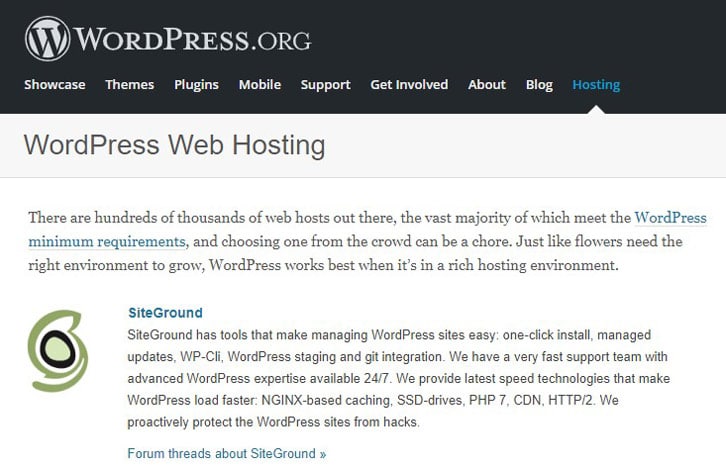
The host we will be using is Siteground.
This web host has worked best for me, my clients, and is officially recommended by WordPress (most popular blogging software that powers 63% of all internet blogs; you will use this too) and a large number of website owners and experts.
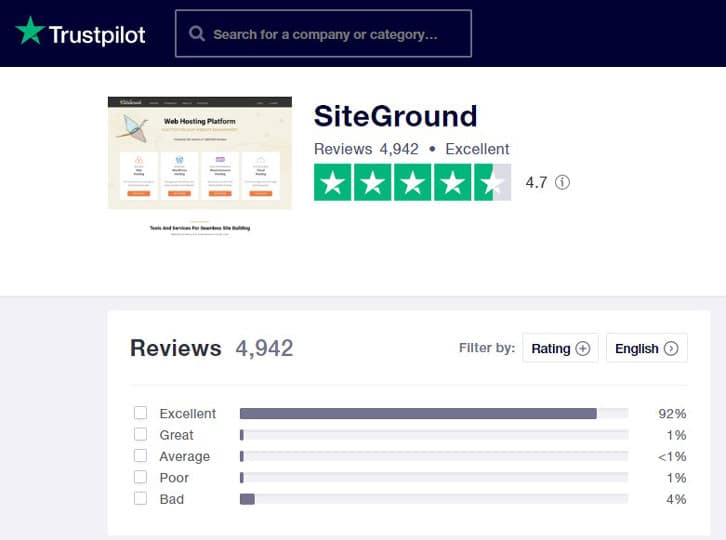
But don’t just take my word for it. See thousand other satisfied users, experts and authorities below.
WordPress Recommended:
Website, blog owners & expert groups:

Trustpilot Reviews:
And many, many others.
So coming back to what I was saying…
The following subheadings will discuss Sitegrounds features and why I believe it’s the best hosting for blogging beginners.
I’d suggest reading the following subheadings as well to be more informed on what makes a good web host, but if you’re already convinced, you can jump ahead to my guide on picking your hosting plan.
2.1. Why Siteground?

In over 10 years of working in the online industry, I have come to know very well what makes for a good hosting provider and it all comes down to:
- Loading Speed
- Uptime
- Security
- Customer Support
- Ease of Use (very important for blogging beginners)
How does Siteground make your blog faster, safer and easier to manage?
Technology
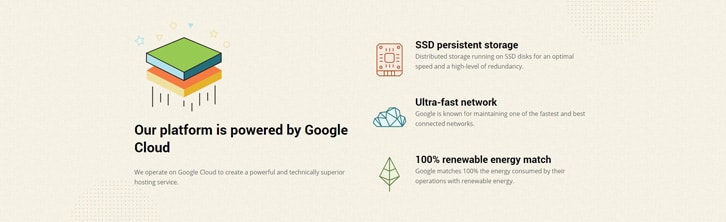
Siteground offers top of the class performance and reliability powered by the ultra-fast Google Cloud. Google is well known for maintaining one of the fastest and best-connected networks.
Their state-of-the-art hardware includes SSD persistent storage and they also match 100% of the energy consumed with renewable energy.
With every plan, they also offer free CDN (Content Delivery Network), which offers an extra speed boost. Usually, CDN’s are bought as a separate service so this is a very nice addition.
Security & Support
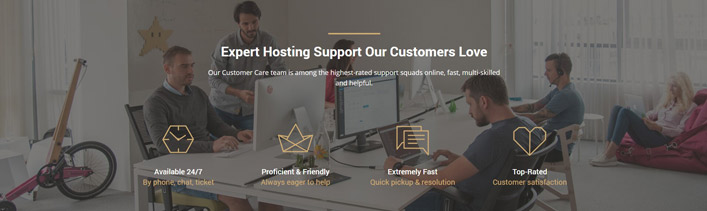
The security of your site is managed at a server and application level. They automatically update your instances and plugins to the latest version and patch against blog-related exploits through their server firewall.
On top of that, Siteground also has a specialized security team and a 24/7 system administration team that watches over the platform.
They have an Expert Hosting Support team that is available 24/7 by phone, chat & ticket. They will make sure that all your needs are met.
Easy to use
As most of you are blogging beginners, you will be happy to know that they are also very easy to use, as their hosting service is a managed one. This means that it’s very simplified and all the technical aspects are managed by them.
Pricing
I’d also like to cover the subject of cheaper hosting. I know there are cheaper ones out there, but so is their performance. You get what you pay for, and if you go with one of these, you will regret it later.
If you care about your future blogging business, I urge you to not look at a few extra bucks each month.

If your hosting is constantly slow or down, if it’s open to security breaches and if you can’t reach customer support to help you out then you will lose a lot of money (not to mention time and stress).
This is something I had to learn the hard way. You don’t have to do the same.
Here are some statistics to consider:
- 47% of consumers expect a web page to load in 2 seconds or less
- 40% of consumers abandon websites that take more than 3 seconds to load
- 73% of mobile users say they’ve encountered a website that was too slow to load
- $1000 per day blog – a 1-second page delay could potentially cost it $25000 per year
From these statistics alone, you can better understand why having a good web hosting service is of utmost importance.
When starting out, many uninformed people go for cheaper options not realizing that their decision is going to cost them much more money because of the low-quality service they’re going to receive.
Now that you’re better informed about the importance of good hosting, let me guide you through every step of setting it up.
→ Click here to get your Siteground hosting with 60% OFF
Then just follow the next steps.
2.2. Choose Your Hosting Plan
After clicking the Siteground link above, you will get to this page and you will have to pick your hosting plan.
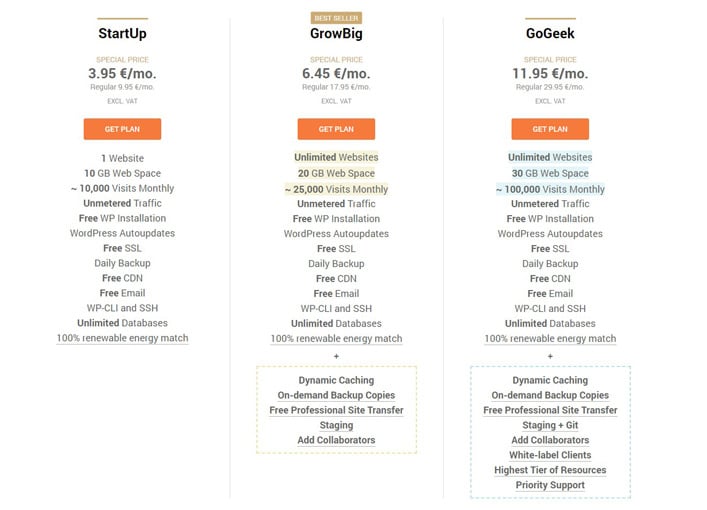
Personally, I would pick the GrowBig plan, as it gives you more room to grow. It has dynamic caching and premium server resources, which will make your blog faster.
If you’re really serious about your blogging career and want to start with the best there is, get the GoGeek plan as it’s the fastest and will also offer your priority support.
If you’re short on cash go with the StartUp plan and just upgrade to a higher one whenever you need to.
Once you’ve decided on which plan best suits your needs, just click the orange “GET PLAN” button.
2.3. Pick Your Blog’s Domain Name
After you click “GET PLAN”, you will get to this page where you will pick your domain name:
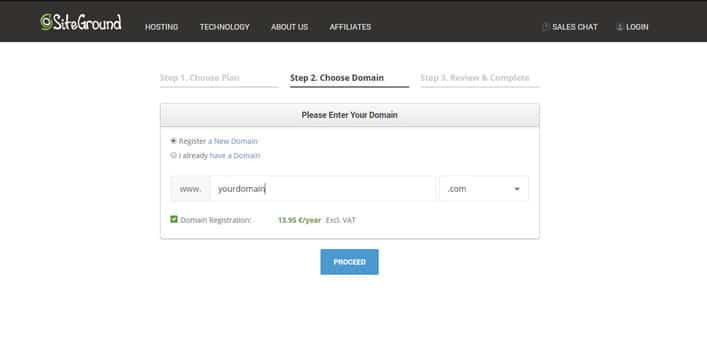
You will just have to input the domain name you decided upon and found available in Step 1.
Once you input it and Siteground also confirms that it’s available, just click the blue “Proceed” button.
2.4. Billing Period and Data Center
On this next page, you will have to enter your billing details and you can also select your data center and billing period.
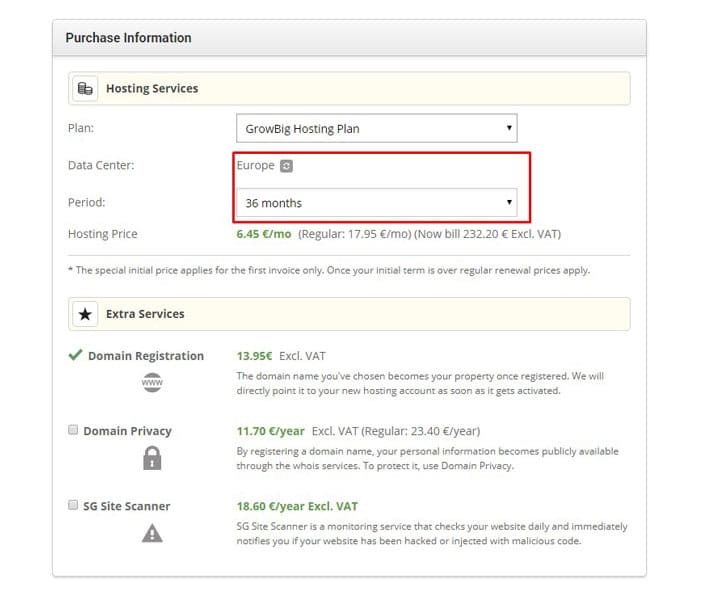
The Data Center determines where your files will be hosted. I recommend choosing one that’s closest to your target audience. In other words, if you’re mainly targeting people from the US, pick a US Data Center.
Likewise, if you’re mainly targetting people from Europe, choose Europe Data Center. The closer the data center to your target audience, the faster your website will load for them.
For Billing Period I recommend going with 36 months or the highest you can afford. This is because renewal prices are usually higher and you want to make sure you get the best deal.
This will also give you enough time to make enough money with your blog, so that no renewal price is a problem.
After all of these are picked, just finish the checkout process to secure your blog’s hosting.

The next 3 steps will guide you through how to install your blog, how to design it and how to create your first blog post.
Step 3. Install WordPress – Your Blogging Software

WordPress is the best blogging platform, period. It’s easy to use and powers more than 37% of the entire internet and more than 63% of all blogs (Source: W3Techs).
One of the best things about it is that it’s also free to use.
It’s a very cost-effective solution compared to other options. Learning how to build a blog might seem though, but WordPress makes it as easy as possible. It’s the best way to start blogging.
It comes packed into your hosting account and in the following paragraphs, I will guide you through setting it up.
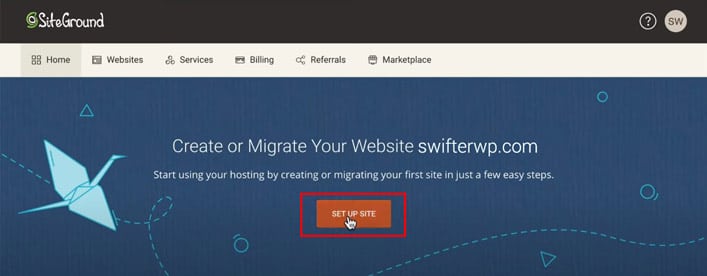
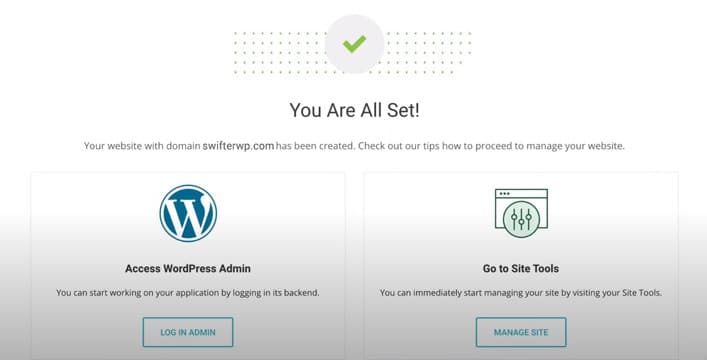
After finishing your checkout, you will have to click the button saying “Proceed to Customer Area”. This will take you to this screen, where you will click “Set Up Site”:
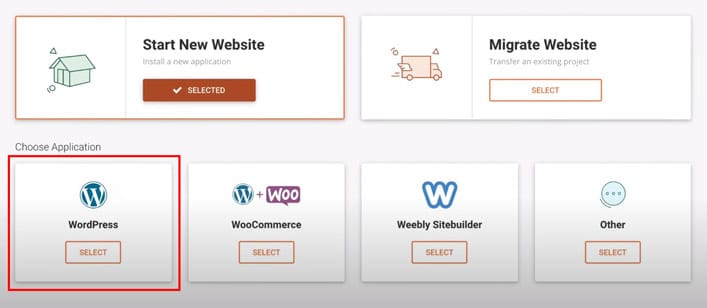
On the next page, as most of you will be starting a new blog, you will have to click on “Start New Website”.

Selecting this will open up a few other options below. Here you will select WordPress.
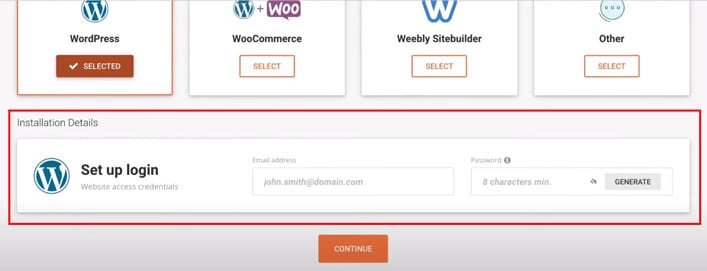
You will then be asked for the credentials you will use to login to your WordPress blog. Input your preferred email and a password you will remember (but that’s not easy to guess by others) and then press continue.
On the next screen you will be asked if you want to add any extra services. Personally, I never added any, so I recommend skipping them and just clicking the “Finish” button.
You will then have to wait a few moments for your blog to be live and ready.
Alternatively, you will always be able to login to the admin part of your site by accessing www.yoursite.com/wp-admin. This will be useful for future logins.
The following steps will now teach you how to design your blog and how to write your first blog post.
Step 4. Customize Your WordPress Blog

Now that your blog is up and running, you will want to add your own unique touch to it.
You will want to change the look of it, add different functionalities and do general optimizations.
Such things can be done by working on your theme, plugins and general WordPress settings.
The theme will determine the look of your website, while the plugins will add or extend its functionalities.
The customization step might be the most challenging while learning how to start a blog. That’s why as much as possible I will try to stick to basics and cover more advanced methods in other posts.
4.1. General WordPress Settings
WordPress default settings are pretty great.. with the exception of one thing! Permalinks.
Permalinks are the permanent URLs to your individual pages and blog posts. By default, these will not be pretty.
For example, your “About Me” page would be accessed via yourblog.com/?page_id=543 instead of yourblog.com/about.
It makes sense that everyone would want their pages to be easily accessible and clear like in the second example.
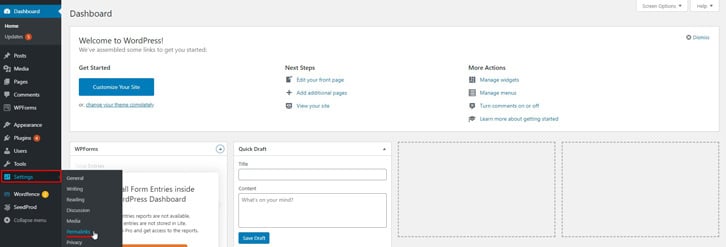
To change these you need to go to Settings → Permalinks.
Once on the permalinks page, be sure to select the “Post name” option and click the “Save Changes” button, as displayed below.
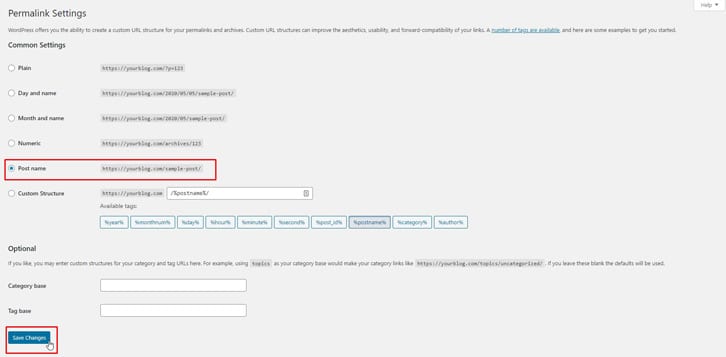
This will make sure that you pages and posts will have pretty URLs.
The rest of the default WordPress settings are great, so lets move on and learn about how to change the look of your blog.
4.2. The WordPress Theme
The WordPress theme will determine the look of your blog, based upon a collection of templates and stylesheets.
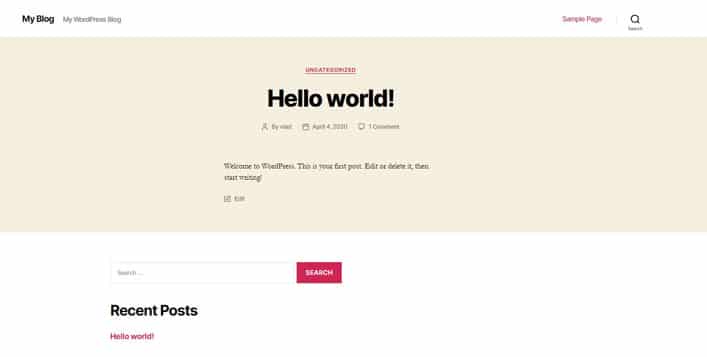
By default, your WordPress theme is going to be Twenty Twenty and your website will look like this:
The good thing about WordPress is that it offers thousands of free and premium themes to choose from. This also comes with its downsides, as people often tend to get stuck with so many options available.
Along the years I’ve tested all the popular themes out there and came to the conclusion that the most important features of a theme are:
- Ease of use – you want to be able to customize it easily
- Speed – no one wants a slow website, as it will have negative impacts on many levels – user experience, SEO, revenue, etc
- Responsiveness – you want your users to be able to easily read your blog on any device
It goes without saying that free themes won’t be better than premium themes. Why? Because developers can’t afford to put in the same amount of work into a free theme as they do into a premium one.
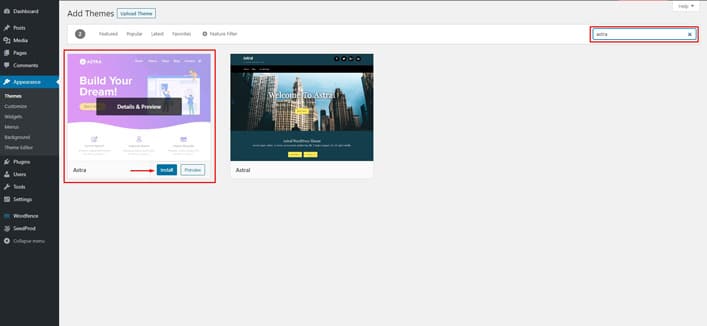
You can add it by going to Appearance → Themes → Add New. Search for “Astra” and then just hover over the theme box and click “Install”.
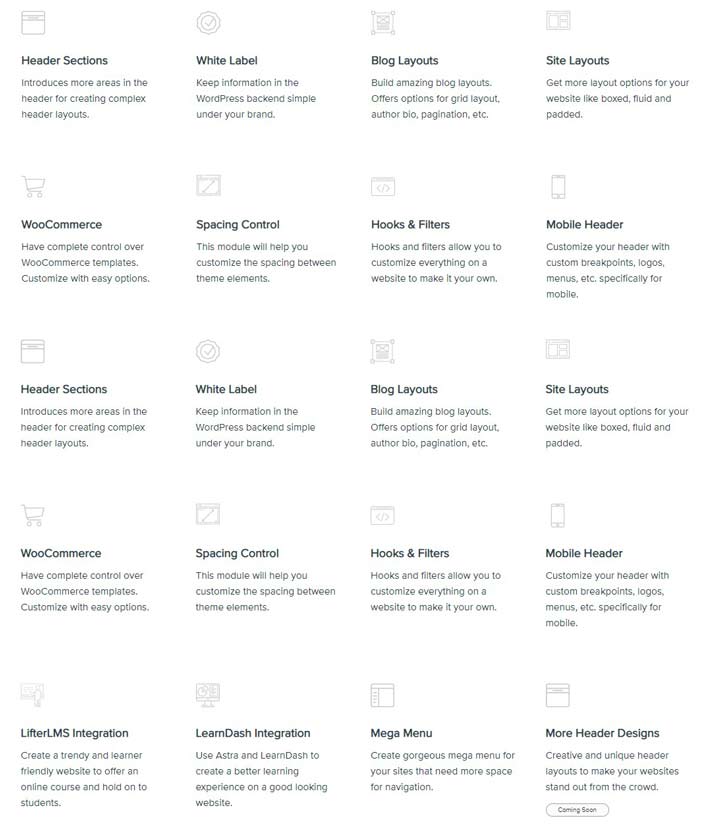
Compared to the free version, it will give you much more control to customize your website however you like. These are the extended full features for those of you interested.
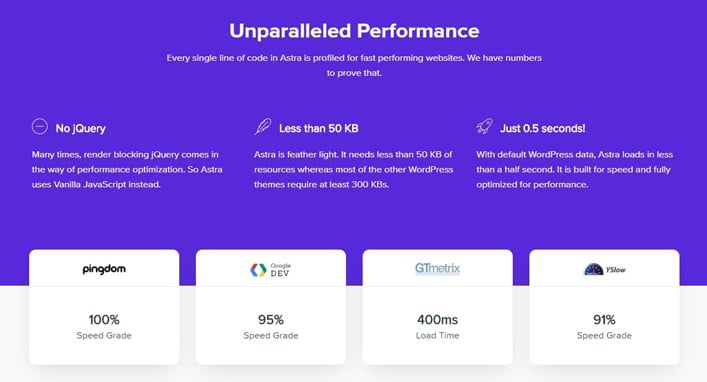
It is a very well coded theme, blazing fast, easy to use and of course responsive.
4.2.1. Customizing Your WordPress Theme
Because covering customizations for all themes is close to impossible, the following paragraphs will focus on the Astra theme customizations.
By now you must have installed either the free Astra theme or the Astra Pro version and might be thinking that your blog doesn’t look much different.
This is because no look customizations have been done to it yet.
Most of you will have a hard time designing the look of your blog from scratch. Luckily, you don’t have to do that.
Astra makes starting out easy for you by offering a good number of beautiful, ready to import templates.
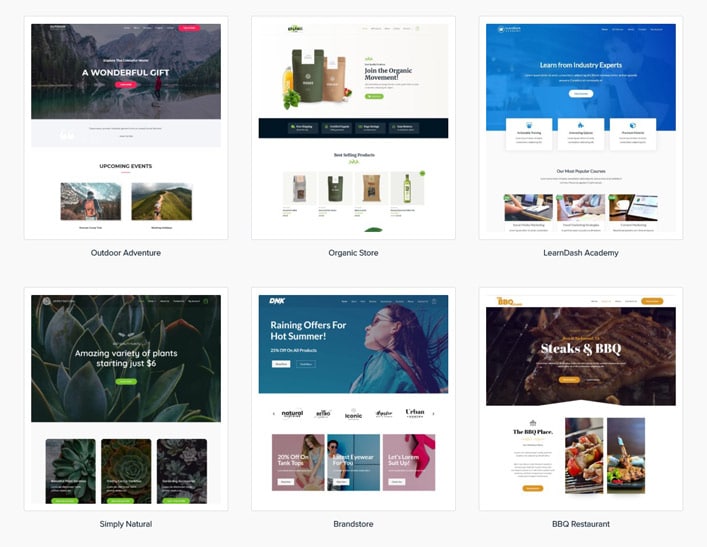
These templates can be imported by both free and pro users, although the pro users will have more templates available to them.
Importing a Starter Template
To import these templates you will have to install a plugin called Starter Templates.
WordPress plugins are basically apps that allow you to add new functionality to your blog. They are similar to apps on your smartphone. We will cover plugins more thoroughly in the next subheading, but as one just came up now, I wanted to explain what they are.
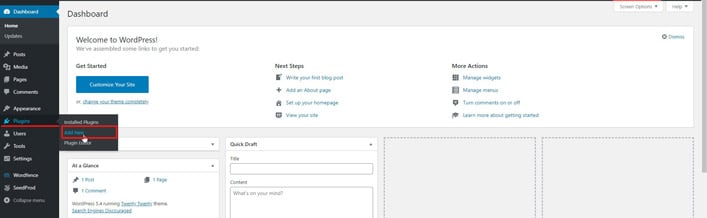
To install the Starter Templates plugin, in your WordPress Admin dashboard, on the left side panel just go to Plugins → Add New.
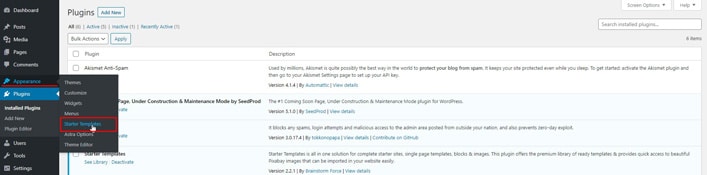
You will then get to the WordPress plugins repository page, where you will search for “starter templates”. Once you identify the Starter Templates plugin just click the “Install Now” button next to the it.

Once the plugin is installed, the “Install Now” button will turn into “Activate”. Please press the “Activate” button.
You will then be taken to your plugins page, where all currently installed plugins will be displayed.
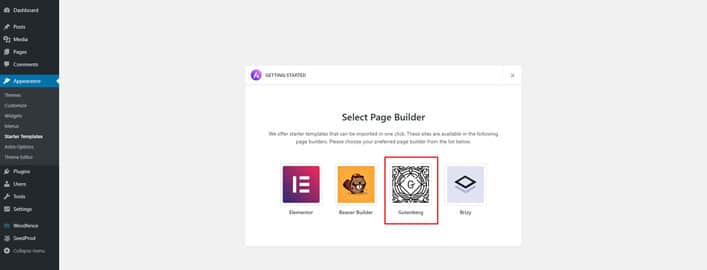
Now that we have the plugin installed, to start importing your Astra template you will now have to go to Appearance → Starter Templates.
You will then get to this page, asking you to select your Page Builder. Please select Gutenberg (which is the default WordPress Page Builder).
This will take you to the repository of Astra templates where you can select the best one for your specific needs.
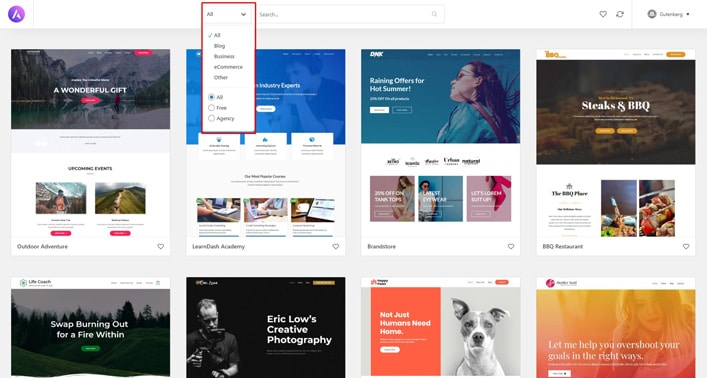
Depending on whether you’ve got the Pro version of Astra or not, you can sort them out by free or Agency (only for Pro members).
As you’re starting a blog, to make it easier for you, I’d suggest sorting them by “Blog” and picking a starting template from there.
This will make things much easier for you, as these templates will already have a blog page created and most of the design done already. Be sure to double-check that they do have a blog page.
You can click on the templates that you find appealing and then click on the “Preview” button in the lower-left corner to have a full preview of them.
For demonstration purposes, I picked Pet Care.
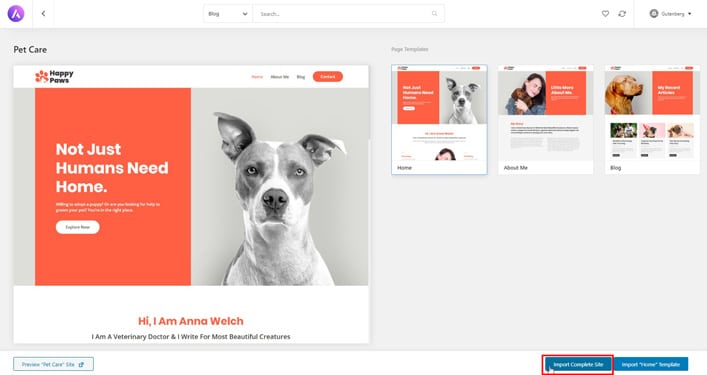
Once you find a template that suits your needs, you just click on it and then click the “Import Complete Site” button in the lower right corner.
It will then ask you what you want to import and what you want to delete from your current installation.

Since this is your first import, you won’t need to delete any previously imported site. Just have the other 4 ticks as in the picture above.
If this is not your first starter template import and you’re importing on top of a previous template, tick “Delete Previously Imported Site” as well.
Once all is imported successfully you will get the following message:
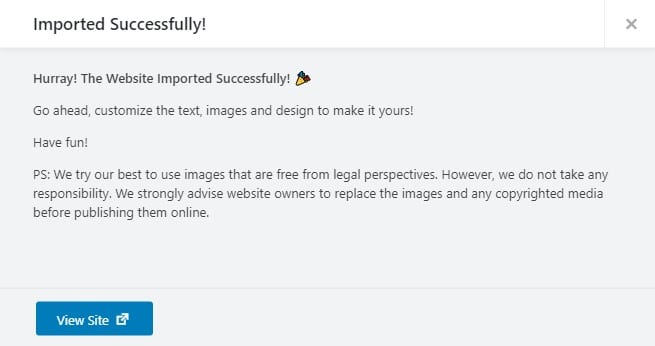
You can now view your sites new look.
Now that you’ve got a good foundation to start with, you can customize your blog even further with your own logo, colors, typography and more.
Let me show you how to do this.
Customizing the Starter Template
Firstly, so all is easier for you to understand and work with, it is worth mentioning that certain elements can be globally customized (one change will affect the whole website – i.e. global text color, global typography, logo, etc), while others can only be customized on an individual level (i.e. certain individual page elements such as background color, page images, etc).
All global customizations will be done from the customizer by going to Appearance → Customize. The changes you will make here will affect the whole website.
Here you will have the options to customize your: global typography, global colors, global buttons, header (top section of webpage), footer (bottom section of webpage), blog and menus.
Once you click “Customize” you will be taken to a page that looks something like this:
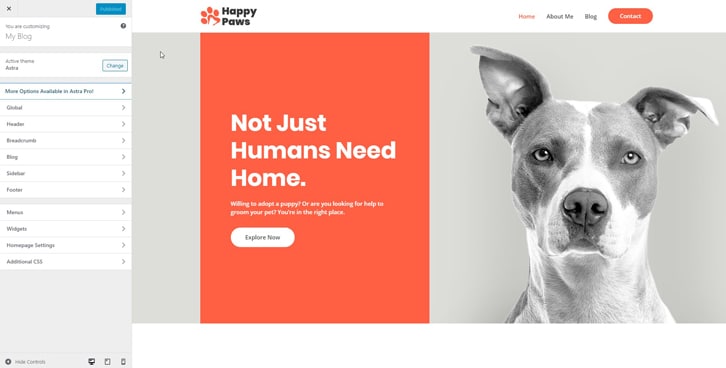
On the right side of the screen, you will see your blog. According to the template you chose, this will be different for each.
Here you will be able to visually see the changes being done to your website while editing things in your left-side panel.
The left-side panel contains a number of options that will help you change the look of your site. Astra Pro users will have more customization options than the free users.
Adding Your Own Logo
Note: All changes you make in the customizer won’t be saved unless you press the blue “Publish” button in the top left corner.
You will want to start with changing your logo.
You can do this by going to Header → Site Identity.
Once there, you simply need to click the “Change Logo” button and pick your own one.
You will also be able to adjust the size of your logo by using the “Logo Width” slider. Just drag this around until you find the perfect size.
Adding Your Site Icon, Title & Tagline
While we’re on this page, you might also want to upload a Site Icon (also called favicon) for your blog. This is the little icon that people see on browser tabs. For example, these are Google’s and anothers favicons, as seen in the Google Chrome browser:

You should also change the Site Title and Tagline while you’re here on this page. Just put something simple, representative for your blog. You will always have the option to come back to this later.
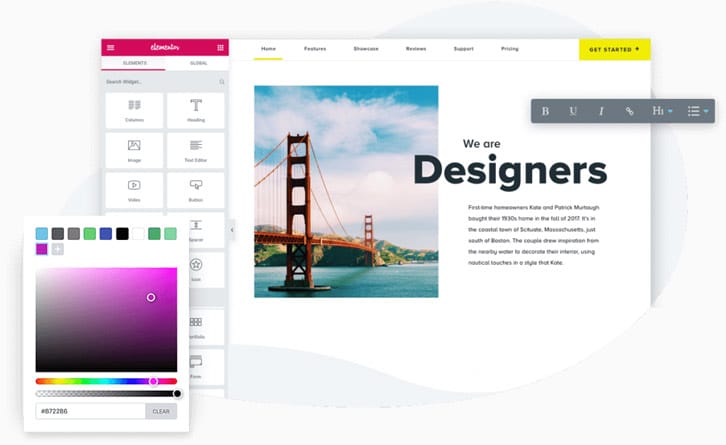
Change Your Global Colors
Once this is done, most of you will want to change the global colors as well.
You can do this from the Customizer as well. Just go back to the main options (by clicking the “<” button in the top left side, underneath the “x”), then go to Global → Colors → Base Colors.
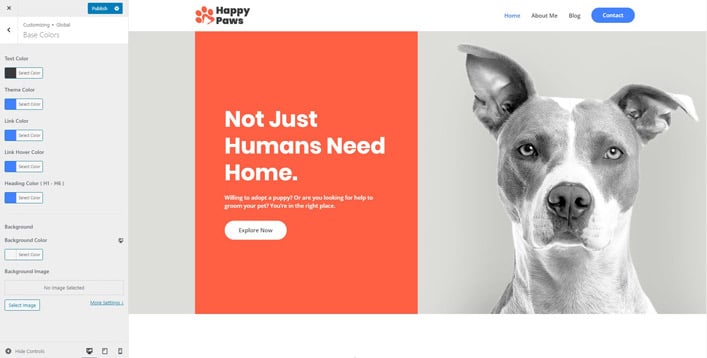
Here you will have the options to change the colors for your: text, theme, links and headings.
Note: You have the option to browse through your pages via the right-hand blog view screen, so that you can see your changes taking place.
While changing colors you will notice that some elements you were expecting to change color don’t actually change it. This is because they are not part of the global elements (explained previously).
In such cases, you will have to edit that particular element individually, by going to its page from the WordPress admin dashboard. This will all be covered later when I teach you how to edit your blog pages.
Page Header & Footer
Certain elements from the header (top section of webpage) and footer (bottom section of webpage) can be edited directly from the customizer just by clicking “pen” icon, as seen below.
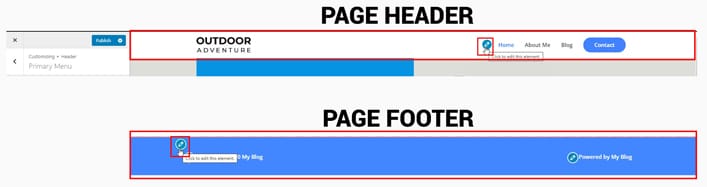
For additional changes to these, just press the “<” button again until you arrive at the main customizer options, where you will be able to select “Header” & “Footer” for even more customization options.
Menus
You can customize your blogs’ primary menu by going to Menus → Primary Menu.
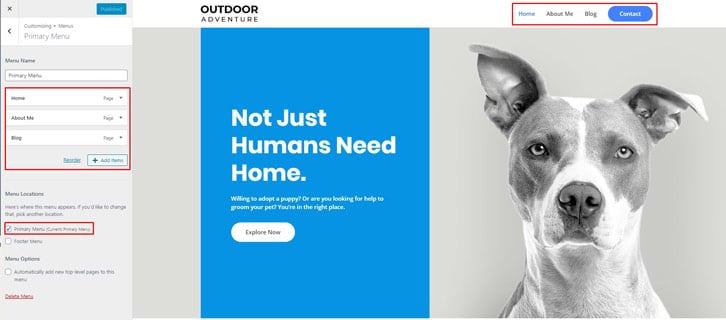
Here you will be able to re-organize or add new pages or posts to your menu.
If you’ve already got your home, about, blog and contact pages in the menu, I’d say you’re alright for now.
Whenever needed, you can always come back and add other important ones.
Note: You can also create footer menus here. Footer menus are simply menus that appear in the footer of your pages. Usually, these contain your Terms of Use, Privacy Policy, Cookie Policy and/ or other legal pages.
4.3. WordPress Plugins
A WordPress plugin is a piece of software that adds or extends the functionality of your blog. They are like apps on your smartphone.
For example, plugins can be used to speed up your site, make it more secure or back it up automatically.
You can view all your blogs installed plugins by going to Plugins → Installed Plugins.
There are a number of essential plugins that I always install on each of my websites.
I’d recommend you to install all the following free plugins:
- Wordfence Security – Will keep your blog safe.
- Updraft Plus – Will automatically backup your blog.
- Rank Math – Will help you optimize your blog for the Search Engines.
- WPForms – Beginner-friendly WordPress contact form. (Will be used in a later step, so be sure to install)
- Akismet Anti-Spam – Protects your blog from spam.
- Smush – Compresses and optimizes your images for a faster loading time.
- SG Optimizer– Caching plugin that will make your website faster. Will only work on Siteground hosting.
- Cookie Notice for GDPR & CCPA* – If you will have readers from Europe or California, it’s very important to have this plugin in order to comply with the EU GDPR cookie law and CCPA regulations.
- Email Address Encoder – Will protect your emails from being harvested by malicious robots.
All of the above plugins are free to use in their basic form, and should be more than enough for most of you.
If however, you would like additional features for any of them, you will always have the option to upgrade to their premium versions.
You can start installing these plugins by going to Plugins → Add New and searching for their names.
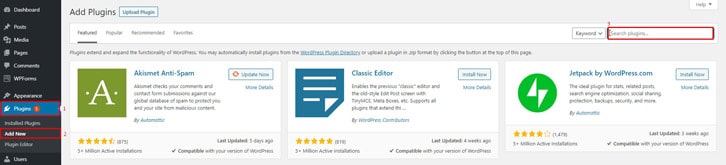
Once you find the plugin, just click “Install Now”.
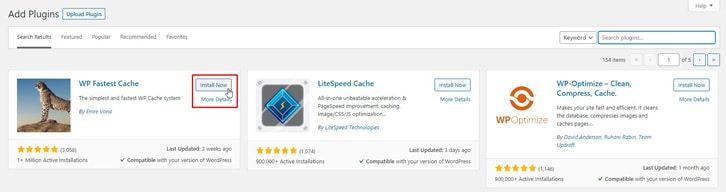
Just wait for it to install (the button will say “Installing”), then click the button again to activate (the same button will now be blue and will say “Activate”).
Elementor will be good for those of you that want to take full control of the design of their blog and that want to create more complex designs in the easiest way possible – with a visual, drag and drop page builder.
Elementor has both a free and premium option. I’d suggest starting out with the free option, testing it out and decide for yourself if you need the premium version or not.
I will be writing some in-depth articles about how to optimize and use each of these plugins individually, so stay tuned.
4.4. Customizing Your Pages – Blog, About & Contact
By default, your blog will have 2 content types: pages and posts.
Beginners will usually get confused with them, so I thought it’s worth explaining them a bit before teaching you how to customize your pages.
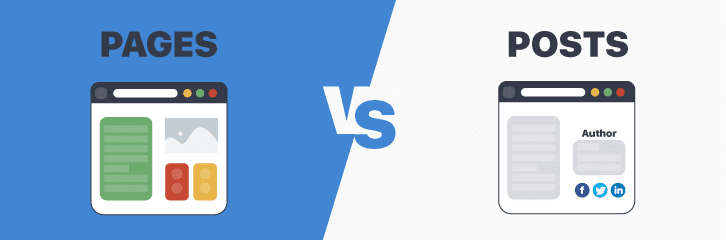
Pages are meant for static, timeless content. No publish date will be displayed on pages, because they are not supposed to expire. Also, these pages are not social in nature, so people won’t be able to comment on these pages (although as of late WordPress allows users to enable comments on pages as well).
They can be viewed and configured by clicking on “Pages” in the left column of the WordPress admin dashboard.
Examples of pages include the Contact page, About page, Privacy Policy, Terms and Conditions, etc.
Posts are blog content that have an official publish date and are displayed chronologically on your blog page.
They are meant to be timely and social. They can be organized based on categories and tags.
You will be using posts for all the articles you will be writing on your blog.
Now that you better understand the difference between Pages and Posts, lets jump in and customize your pages.
4.4.1. Customizing Your Blog Page
You blog page is the page that displays all your blog posts.
Most of you will want to change the text and colors on the default imported blog page. These types of customizations will be on an individual page level, so you will be leaving the customizer (by pressing the “x” button in the top left side).
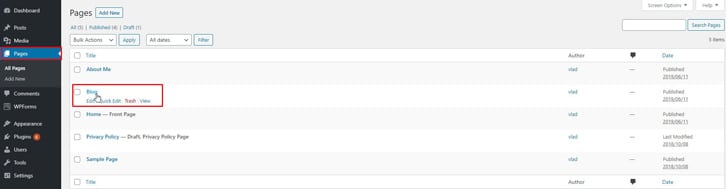
You will be able to customize your blog page by going to “Pages”, identifying the blog page and clicking on its title or “Edit”.
You will then arrive to your Blog page editor, which will look something like this:
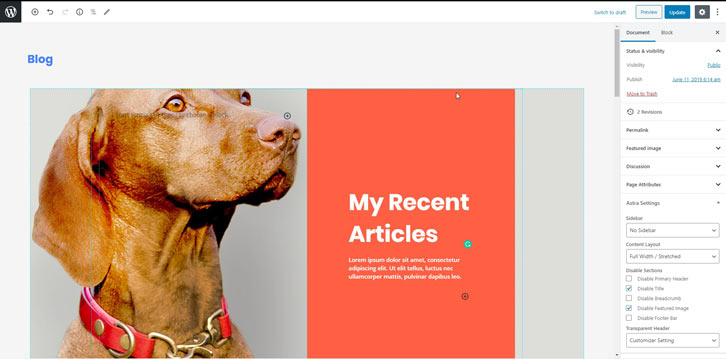
The WordPress default editor, called Gutenberg, is a block-based editor. Those of you that didn’t install Elementor will always use Gutenberg to edit all your pages and posts.
Blocks are content elements that you easily add in your editor to create & design your pages (and posts, which will be covered later).
Each element you add to your page is a block. Blocks can be:
- Text
- Images
- Video embeds
- Audio embeds
- Buttons
- etc
You will notice that your blog page is made using a number of these blocks.
You will be able to edit each of these blocks individually just by clicking on them.
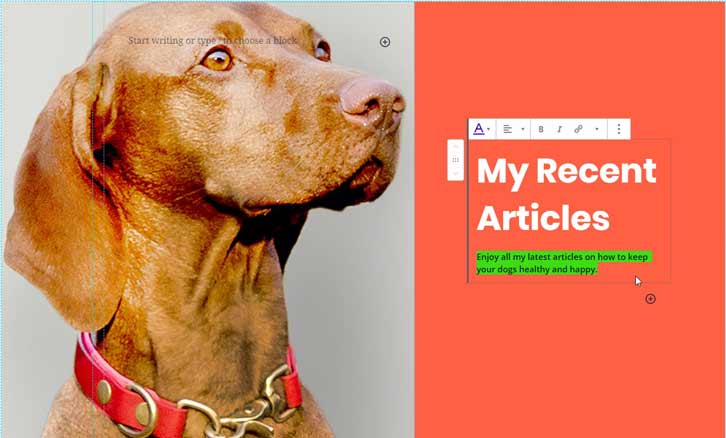
For example, to change the “Lorem ipsum” text underneath “My Recent Articles”, you would just need to select all the text with your mouse and delete it with backspace, just like you would in any other text editor. Then you’d just need to add your own text.
On the right column, you will notice several other options to further customize your pages.
This column has options to customize the whole page (Document tab) or individual blocks (Block tab).
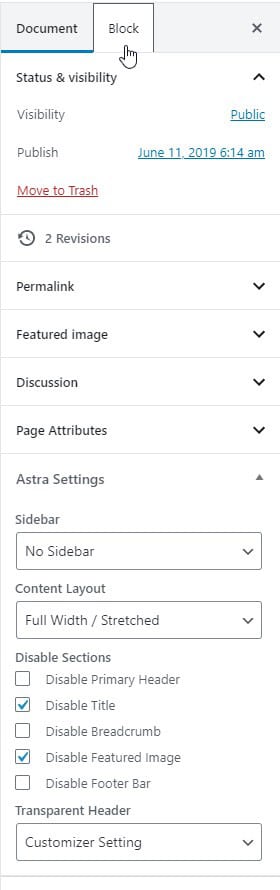
Just leave the “Document” tab for now, as you won’t be doing any changes here.
When editing block elements, however, you will also use the “Block” tab to change things such as color, typography, images, spacing, borders, etc.
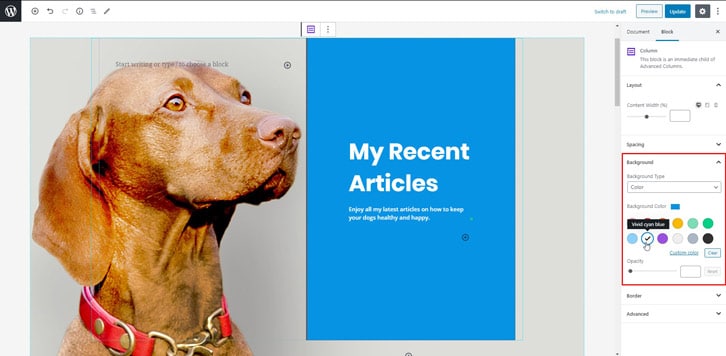
For example, if you’d like to change the orange background of “My Recent Articles”, you would just left-click the block (not the text) and on the right panel go to Background → Background Color and pick your desired color.
After you’ve selected your colors and changed your text, just click the blue “Update” button on the top right side and your page will be updated.
I’d recommend you to just stick to changing the text and colors for now, so you don’t get caught up with too many trivial things.
You will also learn more about deeper customizations later on when I will teach you how to create your first blog post.
4.4.2. Customizing Your About Page
Every website needs an About page to make it easy for their target audience to know what it’s about and how it will help them.
You can edit your About page by going to Pages and identifying it (same way you did with your Blog page). Once identified, click on it and start editing it.
As with the blog page, in this stage I recommend only changing the text, colors and maybe images, so they fit your needs.
We will get into more complex edits later. I know there’s a lot of information while learning how to start a blog, so I’m sticking to the basics and most important things, so you don’t get overwhelmed.
4.4.3. Customizing Your Contact Page
The contact page is another essential page that every website must have.
I’d recommend you to keep it as simple and short as possible for now.
I know that most of you will want to have a contact form on your website. The WPForms plugin will help you achieve this.
If you’ve followed all my instructions up to here, you should have it installed by now. If you didn’t, please go back to the WordPress Plugins section and see how to install this plugin.
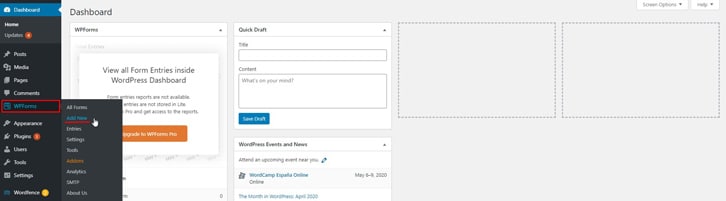
Once WPForms is installed, you will see it’s name appearing in your WordPress admin dashboard, on the left column. Just hover over it and go to “Add New” to start creating your contact form.
This will take you to the WPForms visual form creator that looks like this.
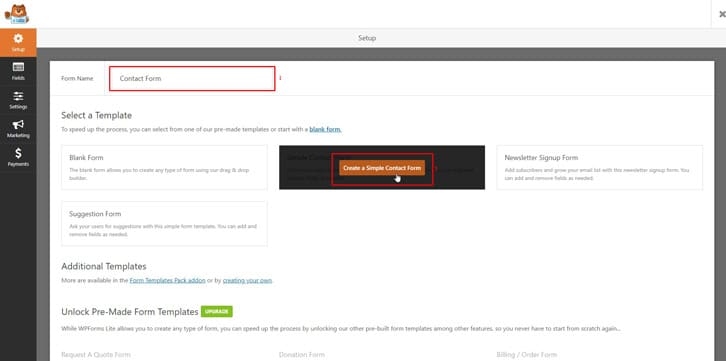
Here you will have to input a Form Name and then just click on “Create a Simple Contact Form”, as displayed in the picture above.
You will then be taken to a page where you will be able to visualize your contact form. Everything will be done for you out of the box here, so no changes needed.
All the emails sent through this form will be received on the WordPress admin email. If for any reason some of you want to change this though, it can be done by going to Settings → Notifications → Send To Email Address.
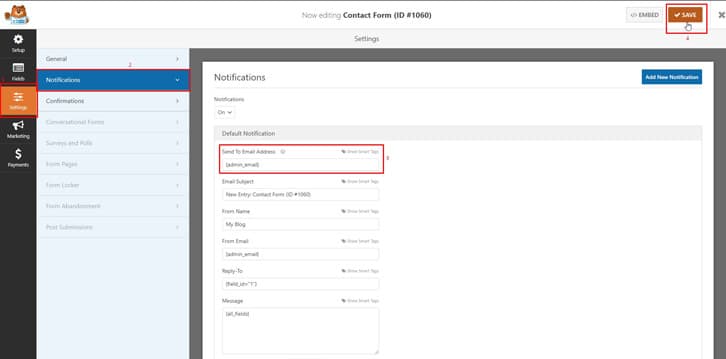
When all is done, just click the orange “SAVE” button in the top right corner. After this you can exit by clicking the “x” right next to it.
Now that we have our contact form created, we will want to put it on our contact page.
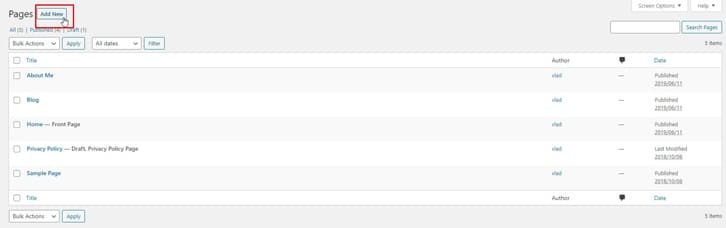
Firstly, go to “Pages” on the left column of your WordPress admin dashboard and see if you have a contact page created already. If you do, just click on it and start editing it.
In my case, for the Astra template I chose (Pet Care), there is no contact page created yet, so the following example will be for creating a page from scratch. If you do have a contact page, just follow along and add the contact form.
Once on the “Pages” screen just click on the “Add New” button.
On the page edit screen, the first thing you want to do is name your page “Contact”. The name of the page will also determine the URL, so in this case, your contact page URL will be yourblog.com/contact.
Side-note: You can change a page or posts’ URL anytime just by clicking on the page or post name and selecting “Edit”.
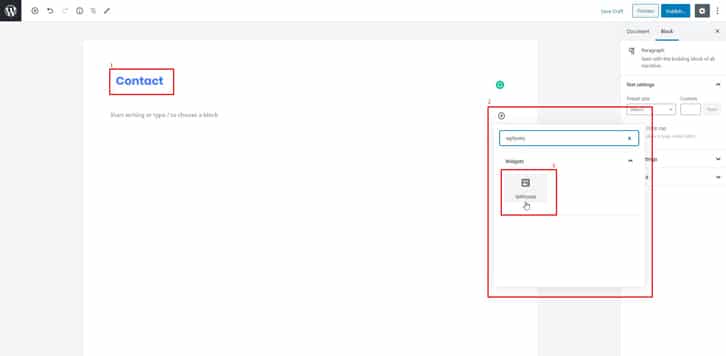
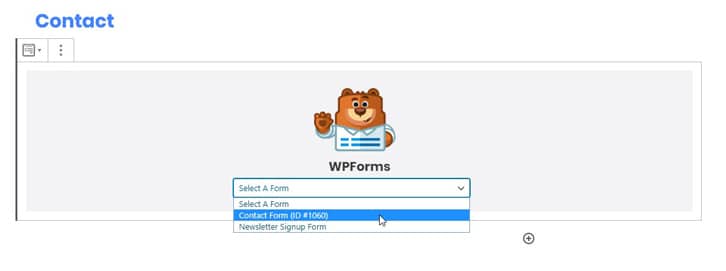
You will then have to add the WPForms block by clicking on the circled “+” sign, searching for WPForms and selecting it.
You will then have to select the contact form created in the previous step as shown below.
Once selected you should see your contact form in the page editor. Now you will just have to save the updates to the page by clicking the blue “Update” button in the top right corner.
When accessing your contact page now, it should look something like this:
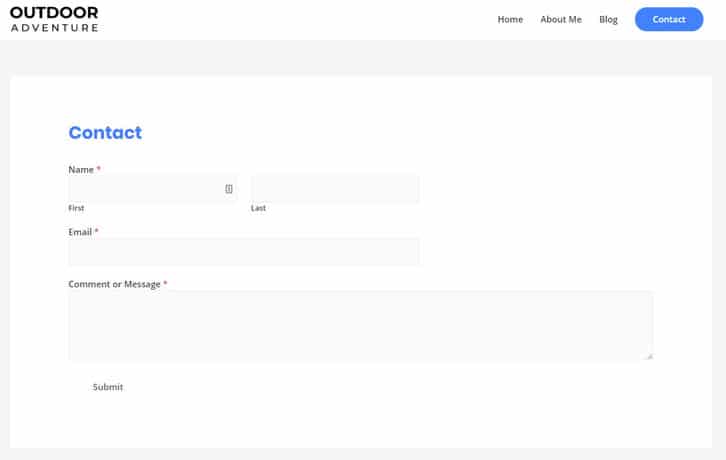
Your contact page is now ready to receive requests from your blog readers. I suggest leaving it in this simple form for now, so you don’t get overwhelmed with too many details.
You will learn more advanced edits later, and you can always come back to your contact page.
Note: Many of you will want to change the colors, text and images on your homepage too. Your homepage is a page as well, so the same principles learned above can be applied to customizing it. Remember to just stick to the basics for now – colors, text and images to reflect the brand you’re creating.
Now comes the part you’ve all been waiting for – creating your very first blog post.
Step 5. Create Your First Blog Post

It’s time to learn how to write a blog. As previously seen, WordPress makes this easy for you with its intuitive editor, similar to your favorite word processing tools.
Writing your first blog post will involve 3 things: Getting to Know Your Customers, Getting to Know the WordPress Editor & The Writing Process.
5.1. Getting to Know Your Customers
If you want to make money with your blog and use your time efficiently, before writing anything it is important to research if there’s any interest in that topic.
You need to get intimate with your audience and learn about their hopes, dreams, pains and fears. You need to get into their mind and learn what motivates them, so you can speak their language.
Don’t let this process scare you. It is very important and it’s not as hard as many make it out to be. To make it easier for you, I will share the process I use.
To get into my prospects’ minds and also determine if they are actively searching for a topic, I use keyword research.
Keyword research is a process that helps you identify popular words and phrases that people type into search engines such as Google.
Finding out what your target audience is searching for, seeing your competition, and the most popular topics will help you understand your prospects better and ultimately help you write successful blog posts.
Keyword research is also a vital part of Search Engine Optimization (SEO), so by doing it right, you maximize your chances of getting more traffic from the search engines as well.
If your main traffic strategy is to drive Search Engine traffic to your website, I’d advise you to stay away from broad niches such as “sports”. Pick more clearly defined topics such as “tennis”.
Keyword research can be done with both free and premium tools. As with all products and services, the premium ones will mostly always be better, but let’s start with a few free ones for those of you short on cash.
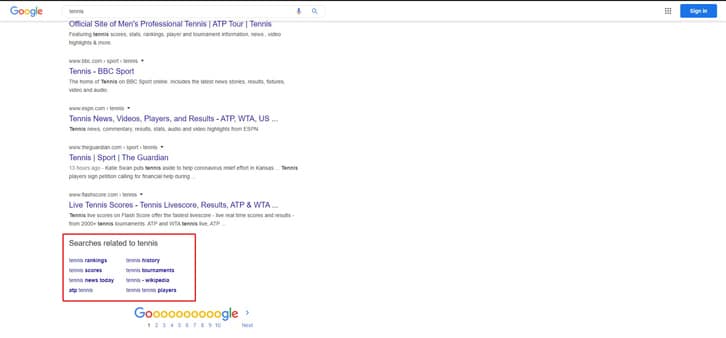
You can simply use the Google Search results to brainstorm some initial ideas. Let’s say that you want to learn how to create a blog about tennis. You’d start by typing the keyword “tennis” in Google.
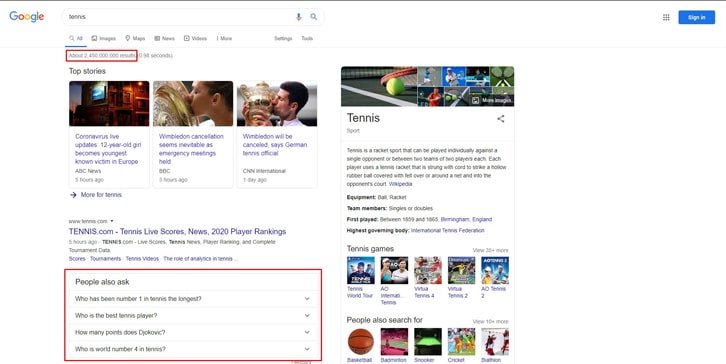
We can see that there’s a huge interest in the niche, with around 2.5 billion results for the term! Also, immediately we can see a few topics & questions that people are interested in such as: “Who has been number 1 in tennis the longest?”, “Who is the best tennis player?” and “Who is world number 4 in tennis?”.
These are all questions that people ask themselves and you can provide them with answers.
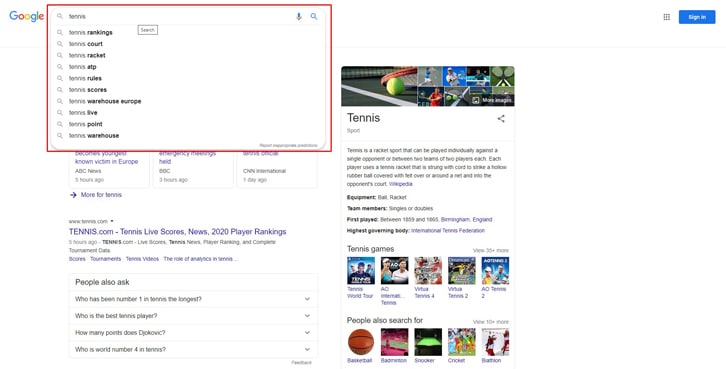
Whenever writing a search term, Google also shows you other top suggested search queries. You can use these to dig even further for topics that people are interested in and gather longtail keywords.
Longtail keywords are longer, more specific keywords and key phrases, i.e. “best tennis racket for beginners”, that you should include in your blog posts.
As with broad niches, it’s best not to decide to rank for broad keywords such as “tennis” as it’s unrealistic to think that you will rank for that term very soon.
It’s best to go for longtail keywords, as they will have a higher conversion value due to their specificity and they are easier to rank for in the search results.
At the bottom of the search page, you will also see a number of searches related to your search. You can use these as well to dig further and find some really juicy longtail keywords and topics.
By going through this process and researching for a few minutes, you can get tens of search term ideas and topics to write about. You can also have a look at your competitor’s websites and determine what strategies worked best for them and were most liked by your target audience.
Another extremely useful free tool (that can also be upgraded to premium) is Answer the Public.
Answer the Public can help you instantly identify topics that your prospects are interested in. The site collects and categorizes phrases that your target market is using in online search.
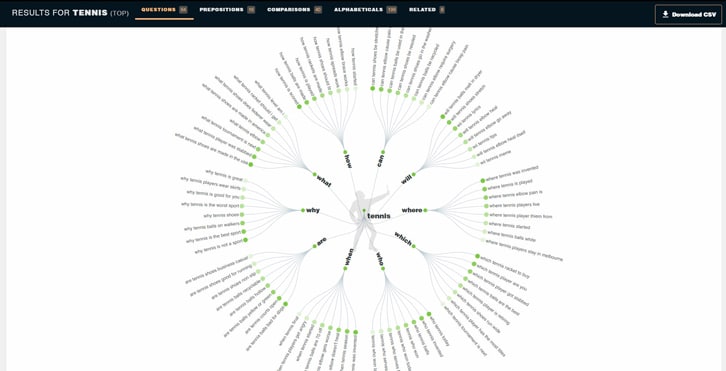
It can show you all the popular questions, prepositions, comparisons, alphabetical and related keywords that your target market is interested in.
It’s an extremely powerful tool that can make sure you never run out of interesting blog topics that your audience is already looking for.
By using these techniques, whenever you write an article you will be entering a discussion that’s already taking place in the customers’ mind, for which they are actively searching for answers.
You will know the exact language they are using, the exact search terms, what they are happy/ unhappy with and all their questions and concerns.
My favorite ones are:
- SEMRush (Click for 7-Day Trial) – One of the best keyword research tools out there. Will help you with all your keyword research and SEO needs. On top of that, you can also use it to improve your Paid Traffic Campaigns, Social Media, Content, PR and Market Research. You probably won’t need any other SEO or PPC (pay per click) tool if you get this one.
- KWFinder – Keyword research & suggestions, keyword tracking, keyword difficulty, competition analysis & backlinks checker.
- Keywords Everywhere – Easy to use and cheap. Very basic, only showing you searches per month for every keyword searched for in Google. It can also show you an approximation of the traffic received by each competitor for the keywords they rank for.
Now that you got to know your audience better and you know what subjects interest them, let’s have a look at the actual process of writing your post.
5.2. Getting to Know the WordPress Editor
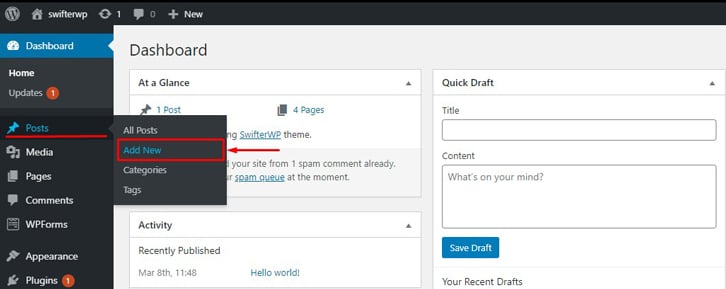
To start, simply hover over “Posts” in the left sidebar and click on “Add New”.
This will take you to the WordPress post editor where you can begin writing your first blog post.

When building your post, you will be using the same content editor you used to build your pages. I suggest using this editor even for those of you that installed Elementor. This is because Elementor is best used when you’ve got to build more complex pages, not posts.
You can easily add blocks by pressing the “+” button and selecting the desired element.
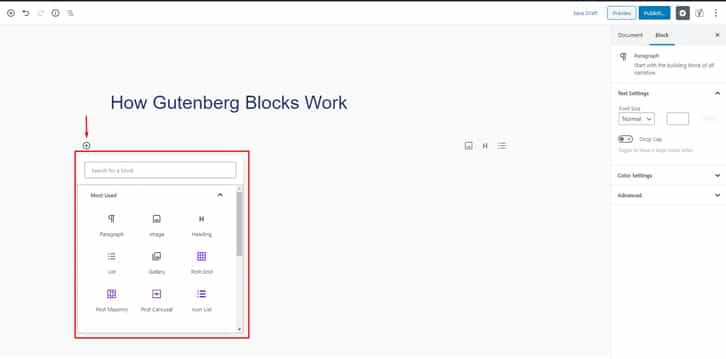
In the example below, the first block is a text one, followed by an image block and then another text block.
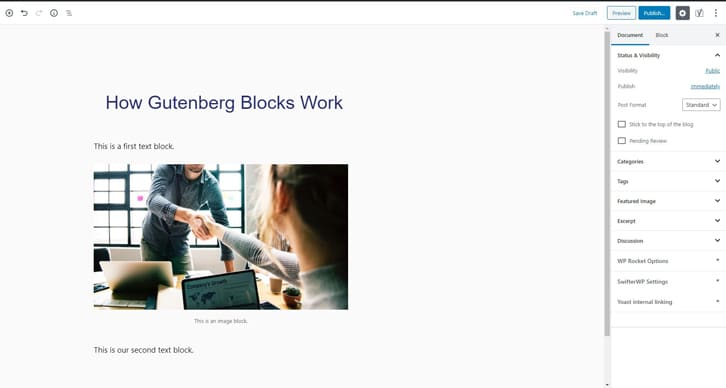
On the right column, you will notice several other options to further customize your post.
You can use the Categories section to broad group your posts. For example, if you have a food blog, you might write about different topics such as: pizza, burgers, vegetarian, etc.
Categories are there to help put all your pizza posts under the same category and all your burgers posts in a different one. This will make your site cleaner and help your readers easily find the content they’re interested in on your blog.
Tags help you micro-categorize your content even further, but are not compulsory to use. They are keywords used to describe the topics discussed in your post. For example, for a pizza post, you could add tags such as: cheese, Italian, chicken, Neapolitan, California style, etc.
The Featured Image option, also known as post thumbnail, lets you choose an illustrative image for your post.
It’s also worth mentioning that some options that will appear in the right column will be dependent on your theme and plugins as well.
Now that you know your customer audience more intimately and you know how to use the WordPress editor, let the writing process begin!
5.3. The Writing Process
You are now equipped with everything needed to start writing your first successful blog post.
Firstly, write your title using all the market research you’ve done until now. Your title will have to be engaging so that it encourages clickthrough. If it isn’t good enough, it doesn’t matter how good your article is, because no one is going to read it.
As you’re just starting out, it might help to have a look at how your top competitors are writing their titles. Observe what works for them and try to apply similar or improved practices to your titles.
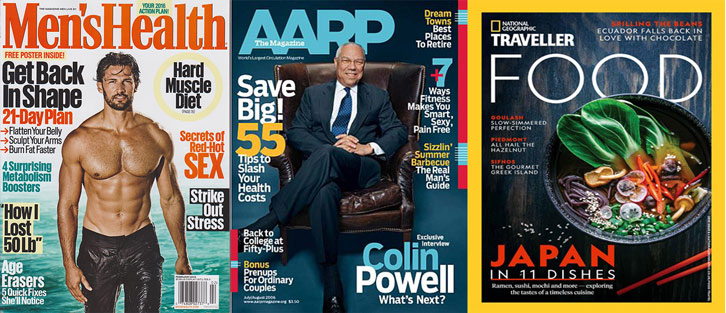
Another thing you can do is look at a few popular magazine titles. Magazine copywriters are some of the best-paid copywriters in the world.
You will notice a pattern amongst all good titles:
- They use words that strike emotional triggers: shocking, revealed, exposed, secret, love, etc.
- They use numbers – “5 Secrets of the Most Productive People”, “Lose Weight in 30 Days”. They do this to create a tangible, easy objective in their prospects’ minds.
- They arouse curiosity
- They highlight the benefit to the prospect
As time goes by, you will get better at writing headlines and will have your own style, which you know that gets results.
Next, you will have to focus on your introduction. In your introduction, you should tell your readers what’s going to be covered in the post. Be sure to make it interesting so that you hook people in and make them want to read your whole blog post.
After you’re done with your introduction, you will have to focus on your body. Your body should be easy to skim, so be sure to make good use of headings, subheadings, and imagery. Using these won’t only make it easier to skim, but it will also keep your audience’s attention better. Also, you should avoid using very long paragraphs.
Lastly, you want to have a conclusion. In your conclusion, you will summarize your blog post. Here you will need to think about the main point that you want to get across and be sure to include it.
A good technique to use in your conclusion is to end it with a question. By doing so, more people are likely to engage with your post and leave a comment. Engaging with your audience creates trust and trust generates more sales.
Step 6. Make Money Blogging

Now that you’ve learned how to start a blog, it’s time to learn how to make money blogging.
If you’re in no real rush to monetize it immediately, that’s great. While starting out, monetization should not be your #1 priority. Just focus on creating the best content possible for your readers and build your audience.
To make money with your blog you need to have 2 things: traffic & a monetization strategy.
6.1. Driving Traffic to Your Blog
There are countless ways to drive traffic to your blog and depending on your niche & target audience, some traffic sources will yield better results than others.
It’s important to note that traffic sources shouldn’t be seen as adversarial to one another, but more like complementary.
However, it’s good to test as many traffic sources as your resources allow you to, in order to determine which one works best for your particular niche and audience.
For example, Instagram and Pinterest have a larger female audience and niches such as lifestyle, fashion and food are very popular. Conversely, if your content is more business-oriented, you will have better results when using LinkedIn.
Having more than one traffic source also ensures your blog’s survival, if by any chance one of them drops.
Now, this doesn’t mean you need to spread yourself thin. I suggest that you master each before moving to the next one.
Let’s explore some of the best sources of traffic for your blog.
6.1.1. Driving Traffic via Search Engine Optimization (SEO)
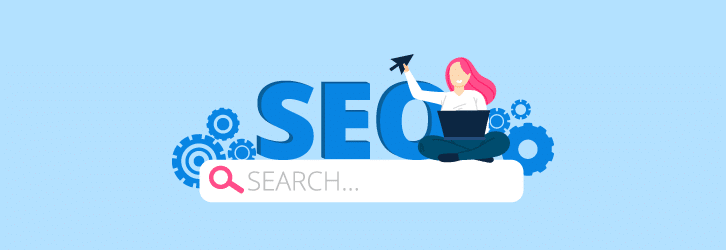
Search engine optimization (SEO) is the process of growing your website traffic by increasing its visibility in the search engines (most importantly Google).
It specifically refers to the improvement of organic traffic (unpaid results).
SEO is a massive source of traffic, Google having an estimate of 5.5 billion searches per day. That’s around 2 trillion a year. Pretty impressive, right?
A websites rankings in the search engines can be improved by following a set of optimization rules.
Sticking to SEO best practices will not only bring you more traffic, but it will also improve the usability and user experience of your website.
I will be writing an in-depth SEO guide on how to improve your blog’s presence in the search engines, so stay tuned.
6.1.2. Driving Traffic via Organic Social Media

Organic social media refers to anything that happens on social media without paid promotion. It means building your social community and interacting with them, sharing posts, and responding to your followers.
Using social media for your content marketing is a great way of acquiring new followers. For example, let’s say you’re a food blog and you’ve got a new blog post interviewing a very famous chef.
Targetting prospects via hashtags, responding to other niche related posts, posting in niche groups & pages, or even contacting key influencers directly and linking to your blog post, will encourage engagement and drive more relevant traffic to your blog.
If your content is good enough, many of these people will follow you and always come back for more.
When just starting out, you’ll have very few followers to talk to via social, so the impact of your content might feel low. But as you move forward and build your audience, you will have some amazing followers as well, who’s shares and comments will help you reach new heights.
At the start of your social media journey, you can also use social ads to raise awareness of your brand and build you following faster. We will talk more about this in the next subheading.
6.1.3. Driving Traffic via Ads

If you’ve got the budget and you want to grow faster or just supplement your already existing traffic, driving traffic via paid ads is a great way to do it.
Again, according to your niche, some ad traffic sources might get you better results than others. But when it comes to delivering results, two ad networks dominate the industry:
They are two different ad platforms, with different benefits and search intents. Both have a mind-blowing active user base in the billions and offer great advertising opportunities.
The main difference between Google and Facebook is in the way they deliver their ads. On Google, prospects are shown ads while they’re actively searching for a solution to their problem via keywords, whilst on Facebook, they are targeted based on their interests and the ways they behave online.
When picking one over the other, you will have to think of your particular situation and ask yourself: What is your objective?
If you’re looking to get conversions or lead generation, then both platforms will be great for you.
If you’re looking for brand awareness, reach and even virality, then Facebook is the place for you.
If you want to sell products and want to catch the buyer in the exact moment he’s searching for that particular product, then Google is your go-to place.
It is important to mention that when evaluating each of the two platforms they should actually be viewed in a complementary, rather than rival way. Whenever possible, they should be used together, not in opposition.
Making use of both the power of paid search and paid social can be a very effective advertising strategy.
I will be writing an in-depth post on how to use Google Ads and Facebook Ads to maximize your blog’s success, so stay tuned.
6.1.4. Driving Traffic via Guest Blogging

Using platforms where your prospects are present already is a great way to drive more traffic to your blog. You can achieve this by guest blogging on other relevant sites and blogs.
Now, some of these will be easier to access than others.
The easiest places to get traffic via guest posting, in which you can appear instantly without reaching out to editors include Quora & Medium.
It’s harder to get guest posts on other similar niche websites and blogs, but it can be very rewarding. You will have to cultivate a relationship with their editors first and in most cases present a portfolio. But as time goes by, you will have the portfolio and the know-how, so doors will open more easily for you.
Before contacting anyone for a guest post, it’s a good strategy to first feature them on your blog. By doing this you’re providing them some value first and they will be more likely to respond positively.
6.1.5. Driving Traffic via Targeted Online Communities

As said before, you want to be where your audience is already present. Online communities such as topically relevant forums, Reddit sub-channels, Facebook Groups and LinkedIn Groups are a great place to be present in and be interactive.
Just remember – you need to be helpful and provide value. Ideally, you should present yourself as an expert in your niche (although you don’t feel like one). Remember though, in these communities, many people will actually be experts in their fields, so it’s important to know what you’re talking about.
Be sure to not just throw links to your blog in there and expect for magic things to happen. This strategy will most probably backfire.
6.1.6. Driving Traffic via Newsletter

One of the best ways to drive traffic to your blog will be via your own newsletters.
Newsletters are a great way to keep your audience engaged and entice them to check out your exciting new blog posts.
I’d actually suggest starting a newsletter as soon as you’ve got your first blog post.
6.2. Monetizing Your Blog

As with traffic, there are many ways to make money with your blog. There is no best way to do it or a one-size-fits-all strategy. You will have to test and find out what works best for yourself and your niche.
Some of you might prefer making money from ad placement on your blog, others will be more daring and want to create their own products or services, while others will enjoy affiliate marketing more.
One of the beauties of having a blog is that once you’ve got a big enough audience, you can actually do a survey and see what would interest your audience the most (Example: A Facebook Ads Course). Once you find that, you’ve got a sure way to make some money.
If you would like to learn more about ways to monetize your blog, that suit yourself and your audience, you can read my article about how to make money blogging.
Conclusion
Firstly, congratulations on learning how to start a blog!
Building a blog is the easy part. At least, I hope that was your case after following my guide.
Creating a successful blog that generates a stable source of income will take a bit of hard work and commitment. But it is totally worth it.
On your journey, you will have a lot to learn. There will be a lot of ups and downs, just like with anything else in life. It’s important to keep on going, continually making small improvements to your system and falling in love with it.
Focus on the systems you’re learning & creating, not on the objective. By focusing on your systems and not your objective, you will raise your chances of success and still reach the objective.
Also, don’t forget that the blogging community is one that helps each other. In that sense, you can always reach out to me with any questions and I will do my best to answer each of you. I will also use your questions to create new posts, to help others facing the same issues.
What was the hardest part for you when learning how to start a blog?