
If you want to learn how to install Google Analytics with Google Tag Manager in WordPress, then you are in the right place.
This tutorial aims to show you step-by-step the easiest way to set things up.
Prerequisites:
- A Google Analytics Account with E-Commerce and Enhanced E-commerce Reporting Enabled
- A Tag Manager Account & the Google Tag Manager for WordPress Plugin – click for a tutorial if you don’t have these, or if you’re not sure you’ve got everything properly configured
Let’s jump right in!
1. How to Install Google Analytics in Google Tag Manager
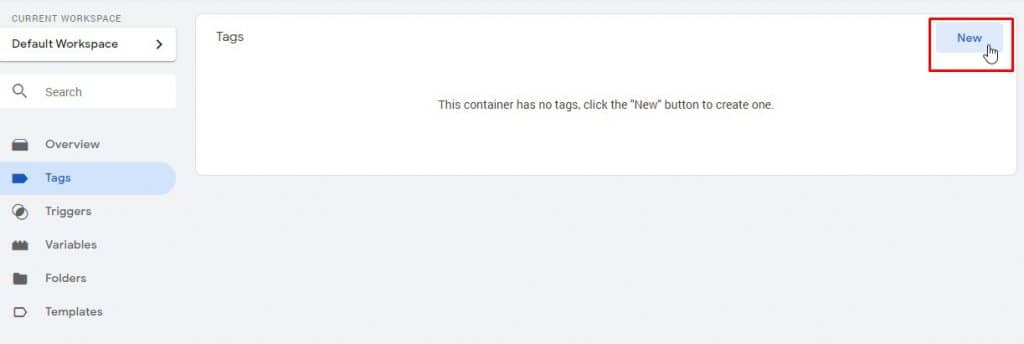
Once you’ve set up your Google Tag Manager Account and have connected it to the Google Tag Manager for WordPress Plugin, go to your Google Tag Manager Dashboard.
Here we will go to Tags → New, and create our Google Analytics Tag.
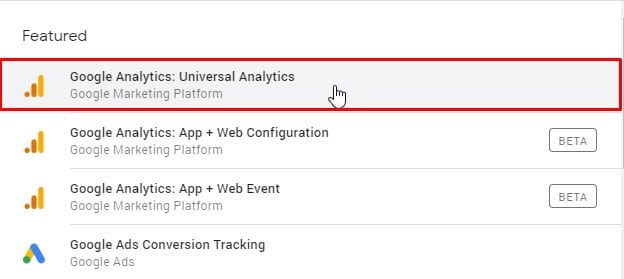
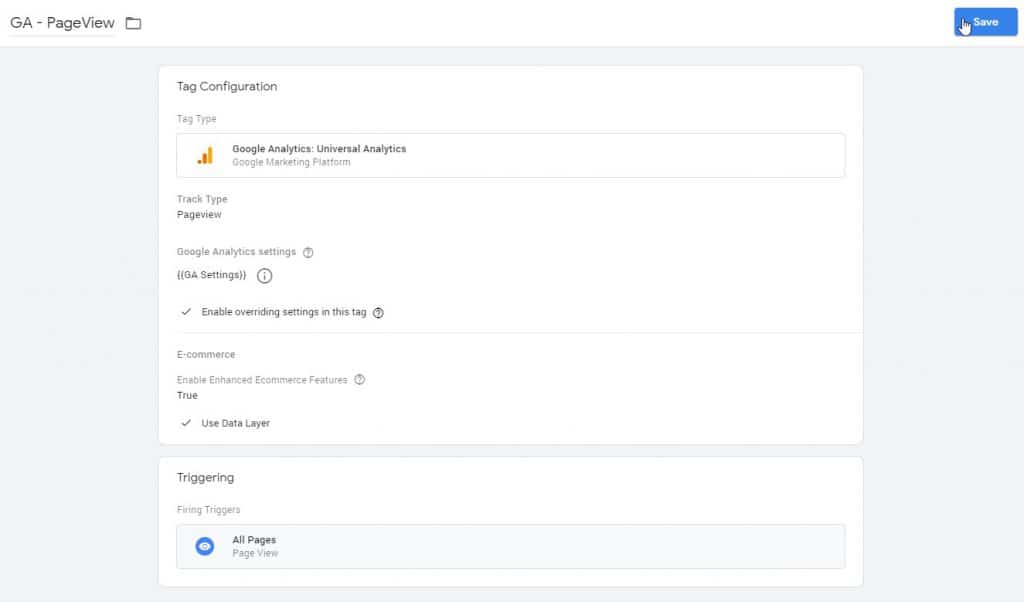
Name your tag GA – PageView and then click on Tag Configuration → then pick Google Analytics: Universal Analytics.
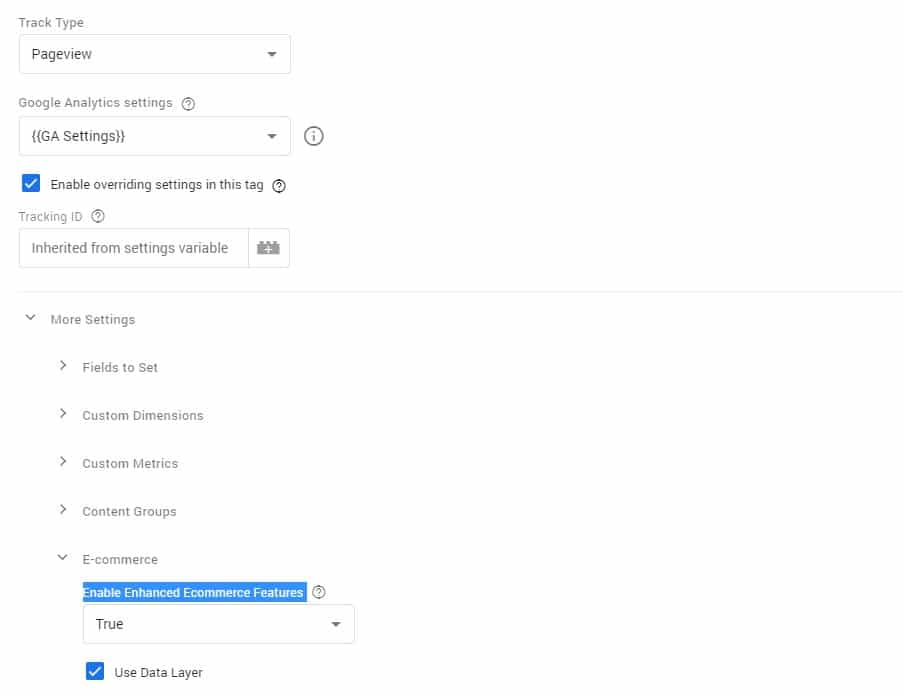
The Track Type will remain PageView. In Google Analytics settings please select New Variable.
Here we will create a variable that contains your Tracking ID, so you won’t have to copy and paste from your Google Analytics Account whenever creating a new tag.
Name the variable GA Settings, copy and paste your Google Analytics Tracking ID and save the variable.
This will take you back to your tag, where you will now have to tick the box before Enable overriding settings in this tag.
You will then have to go to More Settings → E-commerce → Enable Enhanced Ecommerce Features and set this to True.
Then you will also have to tick the Use Data Layer box.
Then we will go straight to Triggering.
Here you will have to create a new trigger that will fire on all pages. Name it All Pages, for Trigger Type select Page View and then just save the trigger.
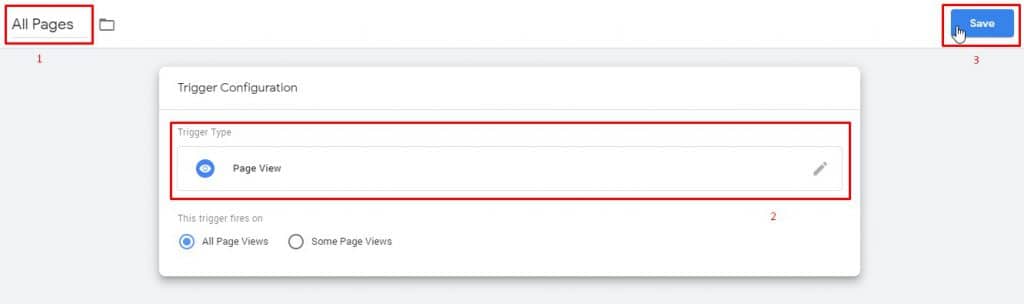
This will automatically add the trigger to your tag, so all that’s left to do is to save your tag.
Congratulations! What we’ve done until now will make sure that your Google Analytics tag will fire on all your website pages and will track the page views.
Most of you will want to also track your E-commerce Events as well. The next part will show you how to set everything up.
2. Tracking E-commerce Events in Google Analytics with Google Tag Manager
This will be nearly as simple to set up as our previous step if you’ve also already installed and properly configured the Google Tag Manager for WordPress plugin.
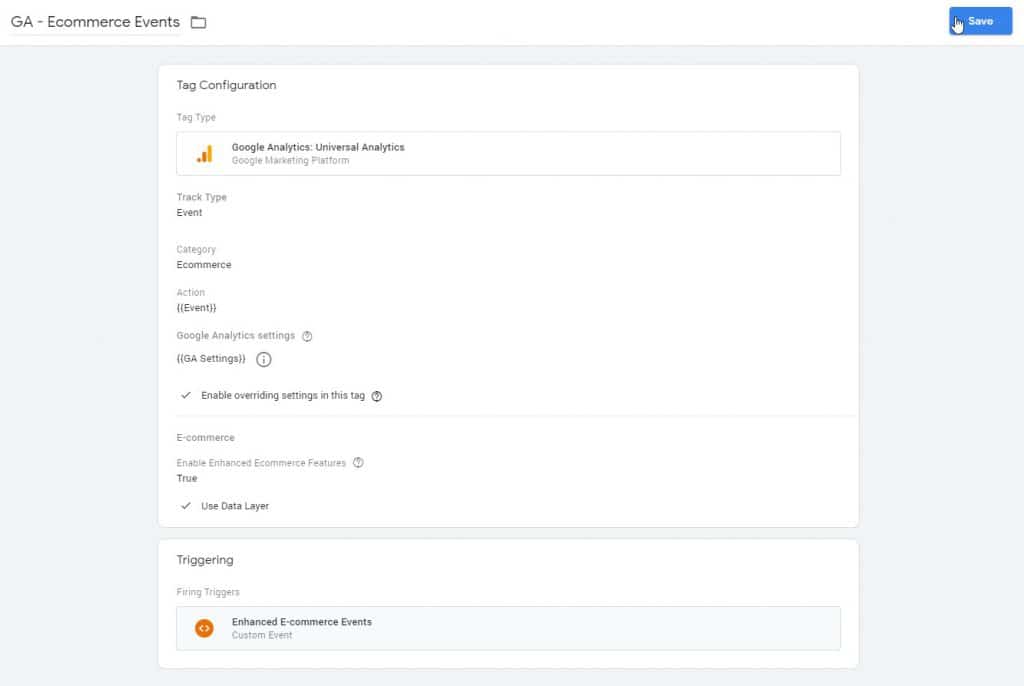
Go ahead an create a new tag and name it GA – Ecommerce Events.
In Tag Configuration we will again pick Google Analytics: Universal Analytics.
In Track Type we will select Event, in Category write Ecommerce and in Action write {{Event}}.
Then, in Google Analytics settings you will have to select {{GA Settings}} – the variable you previously created, so you don’t have to copy and paste your GA tracking ID again.
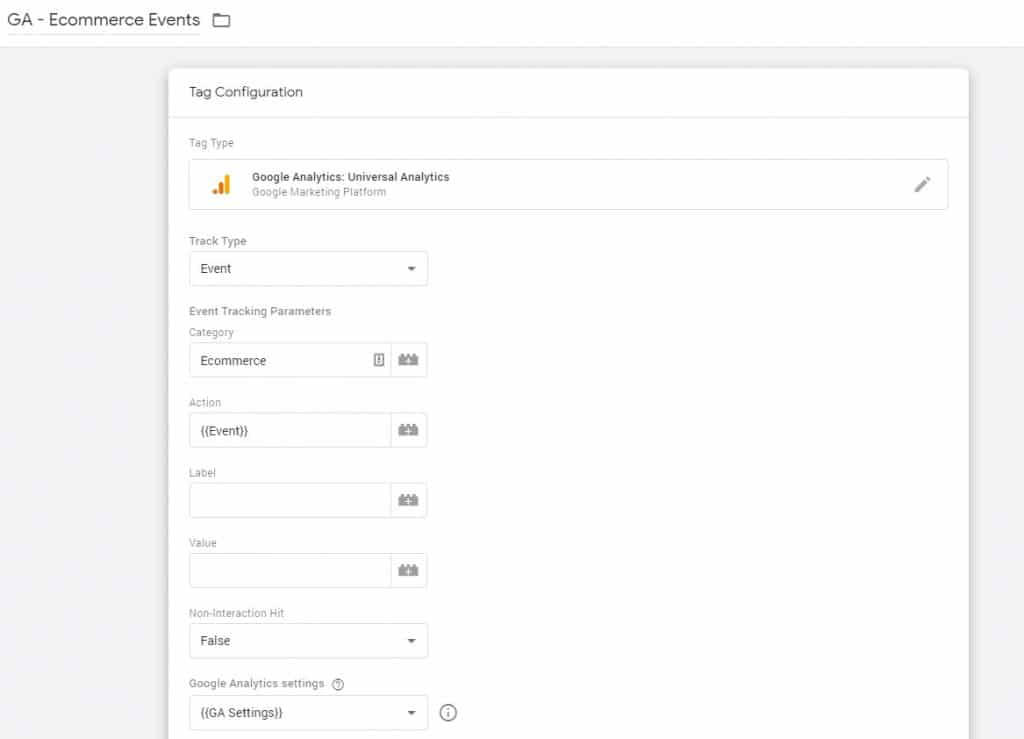
Continuing, you will again have to tick box saying Enable overriding settings in this tag, then go to More Settings → E-commerce → Enable Enhanced Ecommerce Features and set this to True, then also tick the Use Data Layer box.
Then go straight to Triggering.
Here we will have to create a Custom Event that will trigger on all our desired E-commerce events such as: product click, changing variable products, add to cart, remove from cart, initiate checkout and purchase.
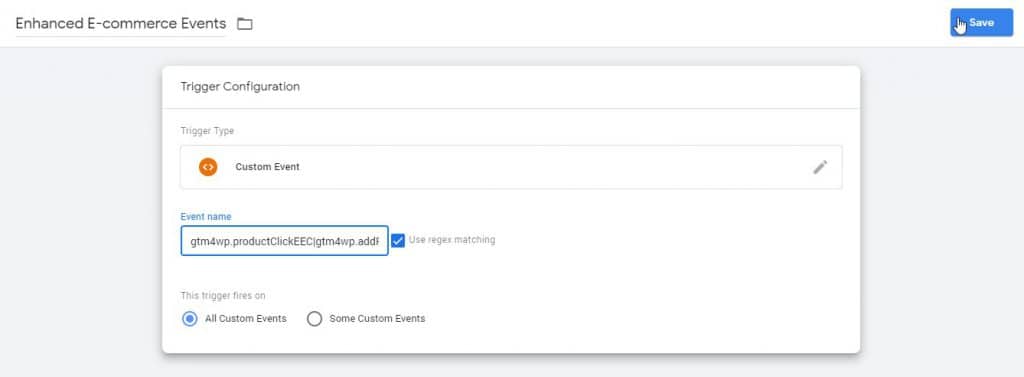
Let’s go ahead and create our new trigger by pressing the “+” sign in the top right corner of the Choose a trigger page.
Name this trigger Enhanced E-commerce Events and as Trigger Type choose Custom Event.
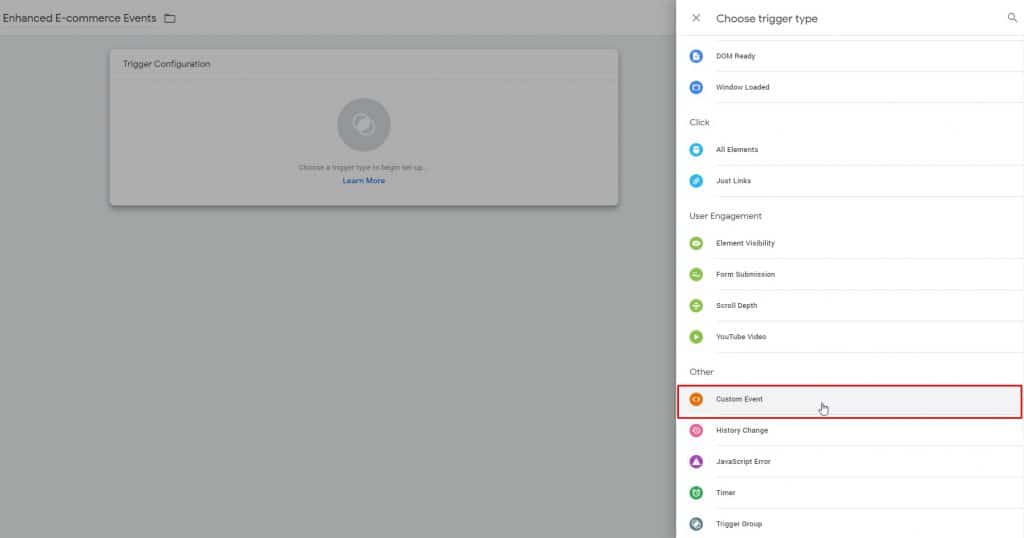
In the Event name field copy and paste the following:
gtm4wp.productClickEEC|gtm4wp.addProductToCartEEC|gtm4wp.removeFromCartEEC|gtm4wp.checkoutOptionEEC|gtm4wp.checkoutStepEEC|gtm4wp.changeDetailViewEECAlso be sure to tick Use regex matching and then Save.
This will take you back to your tag, where your trigger will be selected now. All that’s left is to save your tag.
Also, please remember to Submit your Tag Manager changes, so that they will take effect on your website.

Congratulations! If you’ve followed everything through, you should now be tracking all your E-commerce events properly with Google Analytics and Tag Manager.
The following part is for those of you that would like to also track sessions with Product Views, so your Shopping Behaviour Analysis in Analytics is complete, as such:
Sessions with product views trigger only when a prospect is viewing a product page.
The next part will also show you how to set up your funnel for Checkout Behaviour in Google Analytics.
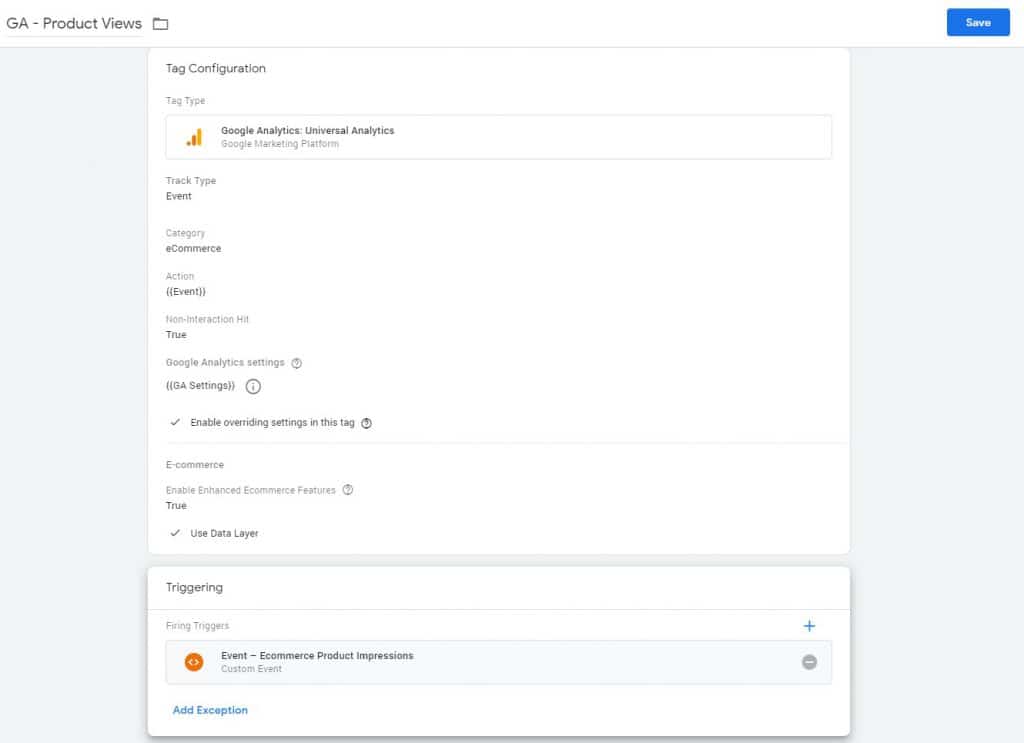
3. Setting up Product Views & Funnel Steps in Google Analytics
3.1. Product Views
Create a new tag and name it GA – Product Views. As before, for tag type select Google Analytics: Universal Analytics.
For track type select Event, for category type eCommerce and for action type {{Event}}.
Set non-interaction hit as True, for Google Analytics settings please select {{GA Settings}} and tick Enable overriding settings in this tag.
Then go to More Settings → E-commerce → Enable Enhanced Ecommerce Features and set this to True, then also tick the Use Data Layer box.
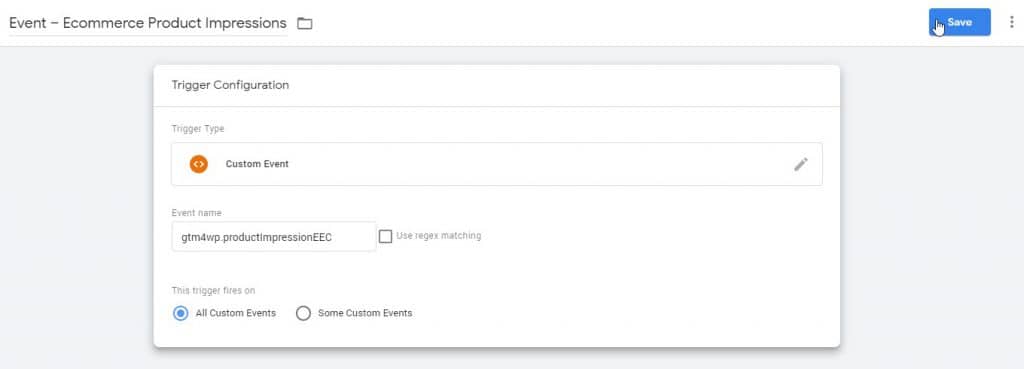
We will jump straight to triggering after this. Here we will create a new trigger and call it Event – Ecommerce Product Impressions and for trigger type we will select Custom Event.
For event name you will put gtm4wp.productImpressionEEC and then save your trigger.
Now save your tag, which in its final form should look like this:
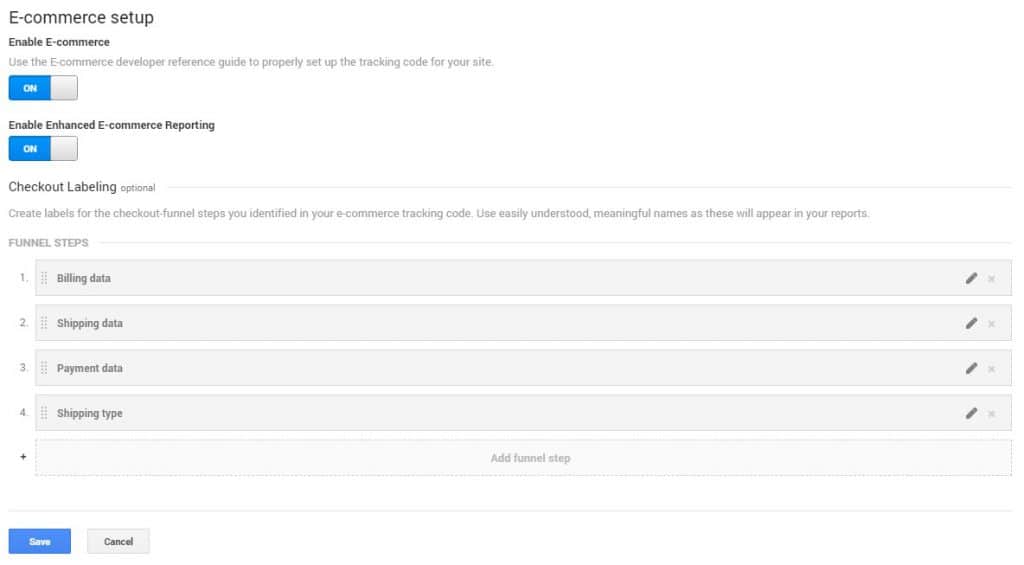
3.2. Funnel Steps
This part is for those of you who want to analyze your prospects’ checkout behaviour in Google Analytics.

Each checkout flow will be different, depending on how you configure it in WordPress, Woocommerce or other checkout plugins you might be using.
In the above example, Shipping Data was put in the funnel, but wasn’t being registered because it was disabled and shipping destination was set to Default to customer billing address in Woocommerce.
In such an instance a correct funnel set up in GA would have been:
- Billing data
- Payment data
- Shipping type
Observe that you don’t need to put Transactions in the funnel, as GA will put it automatically for you.
For those of you that won’t have shipping data disabled, the correct funnel set up will be:
- Billing data
- Shipping data
- Payment data
- Shipping type
You will set these up by going to your Google Analytics Dashboard → Admin Gear in bottom left of screen → E-commerce Settings.
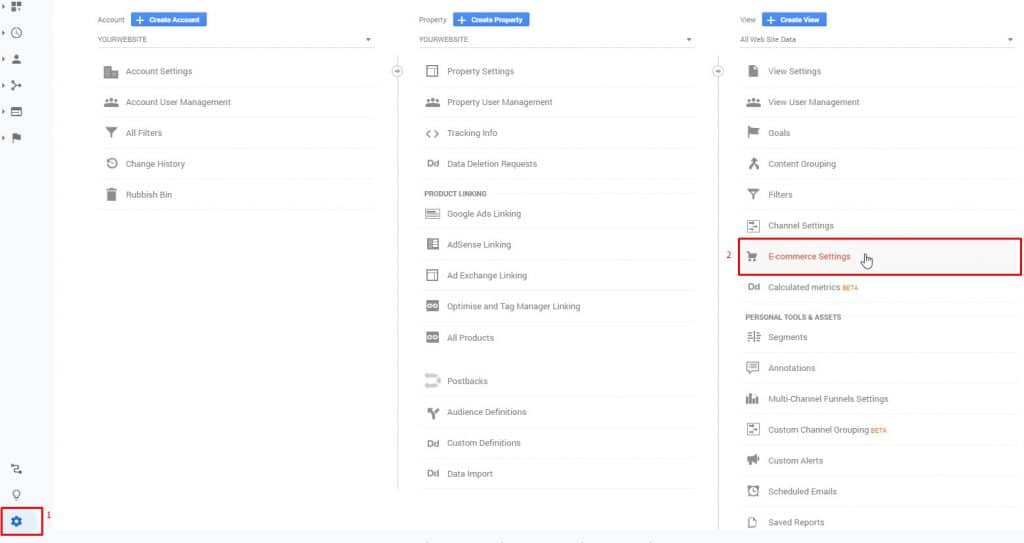
Here, if you haven’t done so already, please Enable E-Commerce and Enhanced E-commerce Reporting.
Then just set up your funnel steps appropriately for your own unique case and save.
4. Testing your implementation of Google Analytics with Tag Manager
Now that you’re done implementing your Google Analytics with Tag Manager, let’s test that everything is running accordingly.
We can do this in 2 ways:
- With Google Tag Manager
- Within Google Analytics
4.1. Testing with Google Tag Manager
To test your implementation with Google Tag Manager you will have to click on Preview. After clicking it, you will see the message Now Previewing Workspace, which means that you can go ahead and access your website now to start the testing.
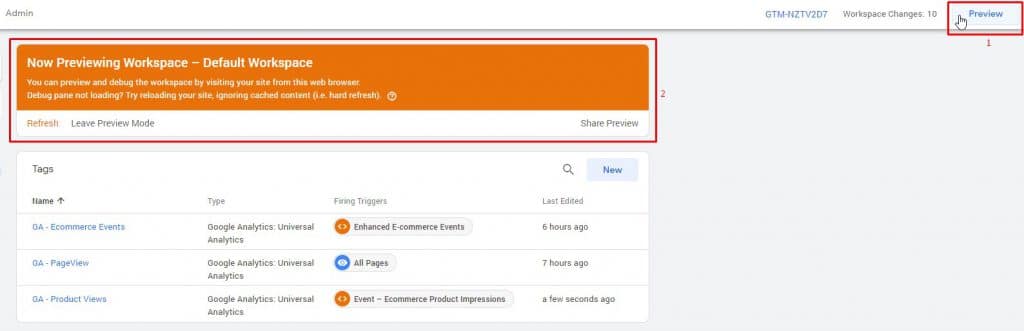
Once on your website, at the bottom of your page you will see the tag manager preview window, which will look as such:

To test the events you want your Google Analytics to track, you will have to go through each event yourself and see if it is being triggered here.
Events include:
- product click
- changing variable products
- add product to cart
- remove product from cart
- initiate checkout
- purchase
For example, in the above screenshot, I visited a product page, picked a variable product and added it to my cart.
You can see that the GA – PageView and GA – Ecommerce Events tags were fired, which means they were set up correctly.
In the above example, you can also see that the GA – Ecommerce Events tag was fired 2 times.
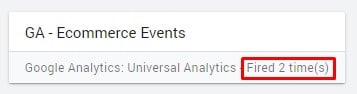
This is because 2 triggers were fired: the variations trigger when product variation was selected (gtm4wp.changeDetailViewEEC) and the add to cart trigger (gtm4wp.addProductToCartEEC).
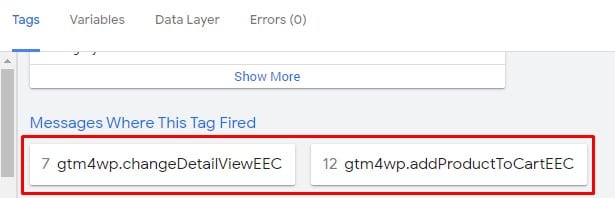
You can view where the tag was fired by simply clicking on the desired tag.
Do this for all of the Ecommerce events of importance to you, to be sure that they are all firing correctly.
Doing these tests, will also register everything in Google Analytics, which takes us to our other testing method.
4.2. Testing within Google Analytics
After going through all of the Ecommerce events, if all was set up correctly, they should also appear in your Google Analytics Dashboard.
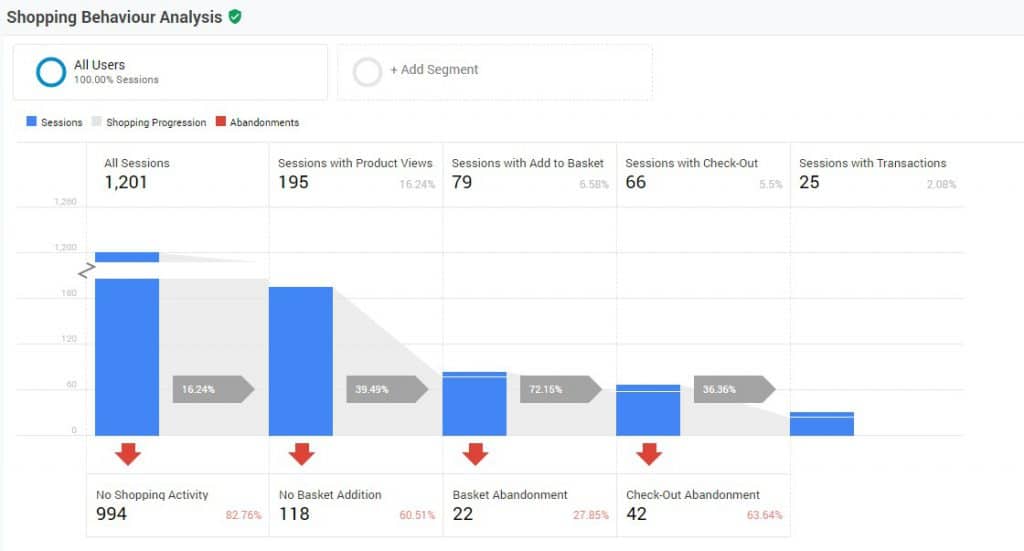
Best way to check if all is being tracked properly is to go to Conversions → E-Commerce → Shopping Behaviour and check the data there.

If your sessions appear, all is set up correctly.
You can also use Overview to see if the proper revenue value is being registered.
Conclusion
A proper tracking setup is vital if you want to run successful ad campaigns, or to correctly quantify your marketing and sales efforts.
I hope that by following this guide on how to install Google Analytics with Google Tag Manager in WordPress, you managed to successfully implement your tracking.
If you have any friends that you think might benefit from reading this guide, please don’t hesitate to share the knowledge.
What was the hardest part for you?